
Lesson 2.1: The Foundation: Diaphragmatic Breathing
The diaphragm is the primary muscle of respiration, a dome-shaped muscle located beneath the lungs. For singing, we must learn to engage this muscle to draw air deep into the lower lungs, which provides the necessary power for a strong, sustained tone. This is often called “belly breathing.”
Stage Fright Tips for Singers: Taking Control
Lesson Overview
Stage fright is one of the most common fears in the world. Whether you are speaking, singing, acting, presenting, or performing in any way. The fear of making mistakes or not being ‘good enough’ can feel overwhelming.
This lesson is designed for beginners and focuses on understanding stage fright. Also, reframing the fear of imperfection. As well as learning practical techniques to regain control and perform with confidence.

Ultimately, by the end of this lesson, you will understand that stage fright is not a weakness. It is a natural response that can be managed, redirected and even used to improve performance.
Learning Objectives
By completing this lesson, you will be able to:
- Understand what stage fright really is and why it happens
- Identify how fear of imperfection affects performance
- Reframe mistakes as part of growth and expression
- Learn simple techniques to calm nerves before and during performance
- Build a healthier, more confident performance mindset
1. Understanding Stage Fright
Stage fright is a stress response, not a personal failure. When you step into a performance situation, your brain may interpret it as a threat. This triggers the fight-or-flight response, releasing adrenaline into your body.
Common symptoms include:
- Rapid heartbeat
- Shaking hands or voice
- Sweating
- Tight chest or shallow breathing
- Racing thoughts or self-doubt
These sensations can feel scary, but they are actually signs that your body is preparing to act. The problem isn’t the adrenaline, it’s how we interpret it.
Many beginners believe:
- If I feel nervous, I’m not ready.
- If I make a mistake, everyone will judge me.
- Good performers don’t feel fear.
In reality, even experienced performers feel stage fright. The difference is that they have learned how to work with it instead of against it.
2. The Fear of Imperfection
At the heart of stage fright is often the fear of imperfection. Essentially, the belief that you must perform flawlessly to be accepted or respected.
This fear can show up as:
- Over-practicing out of panic
- Avoiding opportunities to perform
- Freezing or blanking out
- Harsh self-criticism after small mistakes
Perfectionism creates pressure that blocks creativity and presence. When your focus is on ‘not messing up,’ your attention is pulled away from what actually matters: connection, expression, knowledge and communication.
A key truth to remember:
Audiences connect to authenticity, not perfection.
Most people don’t notice small mistakes. Yet, when they do, they often find them human and relatable.
3. Reframing Mistakes
One of the most powerful shifts you can make is changing how you view mistakes.
Instead of seeing mistakes as:
- Proof you are not good enough
- Something to fear or avoid
Begin seeing them as:
- Feedback for growth
- A normal part of learning
- Evidence that you are trying something brave
Every performance, even a bad one, provides valuable experience. Progress does not come from perfect performances, but from imperfect practice and repetition.
Try this mindset shift:
“My goal is not to be perfect. My goal is to show up and express.”
4. Practical Techniques to Manage Stage Fright
A. Breathing for Calm
Slow breathing tells your nervous system that you are safe.
Exercise:
- Inhale slowly through your pursed lips for 4 seconds
- Hold for 2 seconds
- Exhale through your mouth for 6 seconds
- Repeat 5 times
Effectively, this can be done before or even during a performance.
B. Grounding Your Body
Stage fright pulls you into your head. Fortunately, grounding brings you back into your body.
Exercise:
- Feel your feet on the floor
- Gently press your toes down
- Notice three things you can see and hear
This anchors you in the present moment.
C. Control Your Heartbeat
Replace critical thoughts with supportive ones.
- I will sip this water to lubricate my throat.
- My throat is dry, I will sip this water few times, then breathe.
5. Building a Performer’s Mindset
Confidence is not the absence of fear, it is the willingness to act despite fear.
Strong performers:
- Accept nervousness as normal
- Focus on the message or emotion, not themselves
- Allow imperfections without panic
- Measure success by effort, not outcome
Remember:
Every time you perform while scared, you build courage.
Consequently, stage fright shrinks when you stop trying to eliminate it and start learning to carry it with you.
Reflection Exercise
Take a moment to reflect and write down your answers:
- What do I fear most about performing?
- What is the worst realistic outcome and how would I recover?
- What would change if I allowed myself to be imperfect?
Lesson Summary
- Stage fright is a natural response and not a flaw.
- Fear of imperfection increases anxiety and blocks expression.
- Mistakes are part of growth, but are not a failure.
- Simple breathing, grounding and mindset shifts consequently reduce fear.
- Confidence comes from practice, as well as self-compassion
Vocal Scales for Beginners: Essential Exercises for Singers
While this is a free lesson, we strongly advise you to at the very least, complete the Breath Control Lesson before going through this one.
Lesson Overview
Scales are one of the most important tools for singers. That’s because they train your ear, your voice and your muscle memory. All at the same time. By the end of this lesson, you will understand what scales are, why they matter and how to use them to accurately recreate notes and sing with more confidence.
This free beginner lesson will guide you step by step through learning vocal scales. Additionally, it’s designed for complete beginners. No music knowledge is required, just your voice, a little patience and a willingness to practice.
What Are Singing Scales?
A singing scale is a series of notes sung in order, moving step by step up and down in pitch.
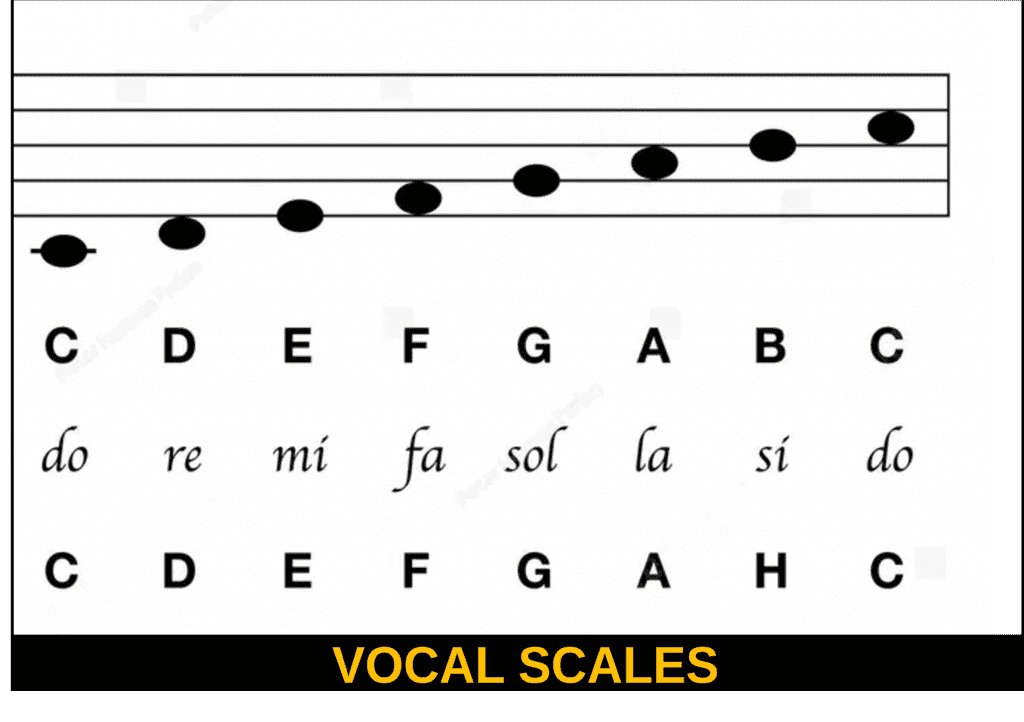
Think of a scale as a ‘vocal ladder.’
Each note is one step higher or lower than the last.
When you practice scales, you are teaching your voice how to move smoothly between notes and teaching your ear how each note should sound.
Scales help you:
- Match pitch more accurately
- Strengthen your vocal control
- Improve tone and consistency
- Build confidence when singing melodies
Step 1: Prepare Your Voice
Before singing scales, always warm up gently.
- Take a deep breath in through your pursed lips.
- Slowly release the air on a relaxed ‘Haaaa’ sound.
- Repeat this 3–5 times to wake up your breathing muscles.
Next, hum softly on a comfortable note. Keep your jaw loose and your lips gently closed. This prepares your voice without strain.
Step 2: Your First Scale (3-Note Scale)
We will start with a very simple scale using just three notes.
Sing this pattern:
Do – Re – Mi – Re – Do
You can use the syllable ‘laa’ or ‘oo’. Choose whichever feels easiest.
Tips:
- Start on a note that feels comfortable—not too high or too low
- Sing slowly and clearly
- Focus on matching each note, not rushing
Repeat this pattern several times before moving on.
Step 3: Learning to Recreate Notes
To recreate notes accurately:
- Listen carefully to the starting note.
- Pause for a second and imagine the sound in your head.
- Sing the note confidently, without sliding up to it.
If you miss the note, that’s okay. Stop, listen again, and try once more. Accuracy improves with repetition.
Step 4: 5-Note Scale Exercise
Once the 3-note scale feels comfortable, try a 5-note scale:
Do – Re – Mi – Fa – Sol – Fa – Mi – Re – Do
Sing this on ‘la’. Keep your volume even and your tone relaxed. Move up by one note each time if possible, but stop if your voice feels tight.
Step 5: Practice Tips for Beginners
- Practice for ten minutes a day
- Use a piano app or keyboard if available
- Always stop if your throat feels strained
- Consistency matters more than length
Final Thoughts
Scales may seem simple, but they are powerful. They train your voice and ear to work together, making singing feel easier and more natural over time. Be patient with yourself and enjoy the process. Every great singer started with scales, just like you are now.
Happy singing!
Vocal Warm-Ups for Beginners: Simple Daily Exercises
In professional settings, your voice is one of your most powerful tools. The clarity, tone and stamina of your voice directly impact your message’s effectiveness. Whether you are leading a meeting, delivering a presentation, or performing. Along with your audience’s engagement.

Just as an athlete prepares their muscles before a competition, a vocalist must prepare their vocal instrument.
VSL Harmonic Identity Warm Up Lesson, shows you how to correctly allow the voice to function freely and efficiently.
Vocal warm-ups are an essential part of healthy voice use. This lesson will guide you through a complete vocal warm-up routine designed to prepare your voice safely, improve tone quality, increase range and reduce the risk of strain or injury.
Also, this lesson provides a structured, two-tiered approach to vocal warm-ups, ensuring your voice is ready for any speaking or singing engagement.

The Essential Role of Vocal Preparation
Vocal warm-ups are not merely a ritual for singers; they are a critical component of professional vocal hygiene. The primary goals of these exercises are to:
- Prevent Strain and Injury: Warming up gently stretches and lubricates the vocal cords, reducing the risk of hoarseness and long-term strain.
- Enhance Clarity and Articulation: Exercises target the articulators (lips, tongue, jaw), ensuring crisp, clear pronunciation.
- Improve Resonance and Projection: By activating the body’s natural resonators, warm-ups help you project your voice with less effort and greater richness.
- Boost Confidence: A prepared voice sounds more steady and authoritative, which translates directly into increased vocal confidence.
This lesson focuses on gentle activation, breath coordination and gradual vocal engagement. Ensuring the voice is never forced.
* Always remember: warming up is not about volume or power. It is about ease, balance and awareness.*
Learning Objectives
By the end of this lesson, you will be able to:
- Understand why vocal warm-ups are necessary
- Release physical tension affecting the voice
- Coordinate breath and sound effectively
- Gently engage the vocal folds
- Tune your voice as part of the warm up ritual
- Prepare your voice for singing or speaking with confidence
Preparation
Each time you are asked to breath in, breath in through your mouth.
Your lips should be pursed as if sucking through a straw.
When breathing in, the abdomen fills with air, as if the breath in is blowing up a balloon. The diaphragm raises gently, up and outward.
When breathing out, it is a method of blowing out through the ‘straw’ and allowing the abdomen to contract in, helping to push all the air outwards. The diaphragm gently lowers downwards.
Your chest should be relatively still. As still as is possible for you, which allows for proper placement of air, Thus, less coughing and tired voice, as well as strain.
Always and Only, Air Before Sound. This is achieved when you breath out as you attempt any of these and any exercise.
The 5-Minute Essential Routine
This routine is designed for situations where time is limited, such as a quick preparation before an unexpected meeting or a short recording session. It focuses on the core elements of breath, cord vibrationand articulation.
| Step | Exercise | Focus | Duration |
| 1 | Physical Release & Diaphragmatic Breathing | Relaxation & Breath Support | 1 minute |
| 2 | Singers Alphabet | Tongue Flexibility & Coordination | 1 minute |
| 3 | Humming & Resonance | Vocal Cord Lubrication & Placement | 1 minute |
| 4 | Tuning | Smooth Tone & Forward Resonance | 1 minute |
Detailed Steps for the 5-Minute Routine
1. Physical Release & Diaphragmatic Breathing. First begin by releasing physical tension. Wiggle your shoulders, gently roll your neck and loosen your jaw. Place one hand on your chest and the other on your abdomen. Then, inhale deeply through you mouth, as if sucking through a straw. Focusing on expanding your abdomen like a balloon while keeping your chest and shoulders still. Next, feel your diaphragm lift upwards and outwards in a gentle flow, coinciding with the flow of air into your lungs. Then exhale with a long, sustained blowing out of the inhaled air. Pushing the air out from your core. Your abdomen now draws in and and your diaphragm slowly lowers. Ultimately, repeat this deep, controlled breath three to five times. Stop if you feel light headed. You may breath in a lot deeper than you are used to, but will get used to it with practice.
2. Tongue Sibilant Trills. This exercise is vital for loosening the tongue, which is key to clear vocals. First attempt to roll your tongue rapidly against the roof of your mouth, making a ‘Tttt Dddd’ sound. The sensation should be of the front of the tongue against the front of the roof of your mouth. The tongue vibrates the sound through the clenched teeth. Once you can sustain the trill, try gliding the pitch up and down like a siren. This warms up the vocal mechanism and the tongue simultaneously. In addition, as part of the Singers Alphabet, all of your songs are enhanced that start with ‘T’ or ‘D’. Also, your approach to those letters in your songs are enhanced too. Try it.
*Remember to hydrate*
3. Humming & Resonance: Humming is the gentlest way to start vocal cord vibration. Start by closing your lips lightly and produce a long, sustained ‘Hmmmmmmm’ sound. Feel the vibration in the mask of your face—around your nose and lips. This is your forward resonance, which helps your voice carry effortlessly. Next, glide the hum up and down in pitch to gently stretch the vocal cords. Now, add ‘Hummmmming’ to this practice. When you say the ‘ming’ part, bring the sound to your nose area, all with a wide smile, which lifts your sound.
4. The ‘M’ Labials. Transition from the hum to simple, resonant words: ‘Meem, Mime, Mohm, Moom.’ The initial ‘M’ sound helps maintain the forward resonance established in the previous step. Say each word slowly and clearly, focusing on a smooth, sustained tone. Repeat the sequence, experimenting with a slightly higher pitch for each word to increase vocal flexibility. Once you feel confident to do this, add a ‘H’ before the ‘M’ to sound like ‘HeM’. This forces the air before sound, which is essential to have a healthy vocal sound. Explore this miracle exercise further in the Singers Alphabet Lesson.
5. Articulation Drill. To finalize the warm-up, focus on the precision of your consonants and vowels. Repeat the sequence: ‘Ma, Pa, Ta, Ma, Pa, Ta.’ Exaggerate the movements of your lips and jaw, opening your mouth wide on the ‘A’ sound, widening as if smiling wide. This prepares your articulators for the rapid, precise movements required for clear, professional vocals.
The 10-Minute Comprehensive Routine
When you have more time and need a more in depth warm up, then this routine incorporates exercises for greater vocal range, stamina and troubleshooting. It includes the 5-minute routine and adds advanced techniques.
| Step | Exercise | Focus | Duration |
| 1-5 | 5-Minute Essential Routine | Core Vocal Preparation | 5 minutes |
| 6 | Sustained Vowels | Breath Control & Stamina | 1 minute |
| 7 | Polo & Relief | Vocal Cord Relaxation & Range | 1 minute |
| 8 | Arpeggios | Vocal Flexibility & Range Extension | 1 minute |
| 9 | Tongue Twisters | Advanced Articulation & Speed | 1 minute |
| 10 | Hydration & Final Check | Vocal Health & Mental Readiness | 1 minute |
Advanced Techniques for the 10-Minute Routine
6. Sustained Vowels. Inhale deeply and sustain the pure vowel sounds: ‘Aaaah,’ ‘Eeeeh,’ ‘Iiiih,’ ‘Ooooh,’ ‘Uuuuh.’ It is essential tha Hold each vowel for as long as you can comfortably, maintaining a steady volume and tone. This builds breath control and vocal stamina, essential for long speaking engagements. Now, once you are comfortable with these, add the ‘H’ as explained in 5 Minute Routine ‘4’.
7. Polo & Relief. Allowing the air to rush through the throat, as if inhaling air through the hole of a polo mint, is a natural way to relax the throat and open the pharynx. Open your mouth wide, as you allow yourself to inhale fully. Then release the air with a gentle, relaxed sigh. Follow this with the Relief ‘Haaaa’ sound. The sound you make when you put down heavy bags and are relieved. Or were bursting to go to the bathroom and the relief is audible. This stretches the lower end of your vocal range and further relaxes the vocal cords. The ‘Haaa’ precedes the ‘Ha’ exercise, which VSL Harmonic Identity uses, as part of the Eugene Technique. It is a unique way to learn Projection for Singing & Speaking Skills. As well as troubleshooting your sound.
*Remember to hydrate*
8. Arpeggios: Starting from your lowest comfortable pitch, slowly and smoothly glide your voice up to your highest comfortable pitch and then back down. Do this on a sustained ‘Ah’ sound. So, it will go like, ‘Ah then up an octave, Ah, up, Ah, up, Ap, up, Ah, down, Ah, down, Ah’. Again. ‘Ah ↑ Ah ↑ Ah ↑ Ah ↑ Ah ↓ Ah ↓ Ah ↓ Ah ↓ Ah’. This exercise maximises vocal flexibility and range, ensuring you can use pitch variation effectively to maintain audience interest. Each step up and down is just one octave or note up from the last one or one lower than the last one. Learn this in depth in the FREE Scales Lesson.
9. Tongue Twisters Challenge. your articulation with tongue twisters. Start slowly and gradually increase your speed, focusing on absolute clarity. Examples include:
‘Peter Piper picked a peck of pickled peppers.’
‘She sells seashells by the seashore.’
‘Unique New York, Unique New York.’
All done as if smiling a broad smile.
*Remember, learning your VSL Harmonic Identity exercises is not a random act, isolated from singing. Practising these exercises, enhances your singing ability and sound.*
Vocal Health and Best Practices
To maintain a healthy voice, integrate these practices into your daily routine:
Hydration is Key: The single most important factor for vocal health is hydration. Drink plenty of water throughout the day. Avoid excessive caffeine, alcohol and dairy products immediately before speaking, as they can dehydrate the vocal cords or create mucus.
Maintain Good Posture: Your voice is supported by your entire body. Stand or sit upright with your shoulders relaxed and your head balanced over your spine. Good posture allows your diaphragm to work efficiently, providing optimal breath support.
Avoid Vocal Abuse: Never shout or whisper for extended periods. Whispering can be surprisingly strenuous on the vocal cords. If your voice feels strained or hoarse, rest it.
By consistently applying these warm-up routines and best practices, you will ensure your voice is a powerful, reliable and engaging instrument for all your professional communications.
How to Practice Singing Effectively: Faster and Smarter Learning
Lesson Overview
Many singers struggle not because of lack of talent, but because they use inefficient learning methods. This lesson teaches you how to learn songs quickly, accurately and confidently. Even songs that feel technically or emotionally difficult.

The focus here is not on repetition alone, but on smart repetition. You’ll learn how to break songs down, train your brain and voice together. Thus, avoiding common learning mistakes that slow progress.
Every singer faces the challenge of a difficult song. A complex melody, a fast lyrical passage, or a tricky key change. The common approach is often to ‘sing it until you get it’, but this brute-force method is inefficient, frustrating and often leads to unreliable memorization.
This lesson introduces an Accelerated Song Learning Method rooted in cognitive science and proven practice strategies. By shifting from mindless repetition to deliberate, structured practice, you can master challenging material faster. Essentially, with more reliably and with greater confidence.
Learning Objectives
By the end of this lesson, you will be able to:
- Break songs into manageable sections
- Learn difficult passages without vocal strain
- Memorise melodies and lyrics faster
- Build confidence before full performance
- Apply the same method to any song
Multi-Modal Memory (The Three Pillars)
Reliable memorisation comes from engaging multiple senses. When you learn a song, you should engage three types of memory:
| Memory Type | Focus | How to Engage |
| Auditory | The sound of the music, pitch and rhythm. | Listen to the song ‘line by line’ only. Listen to the chords and know where to come in. |
| Visual/Cognitive | The lyrics, sheet music and song structure. | Write out the lyrics, as you sing them. Study the timing and as you learn the words, immediately apply your VSL Harmonic Identity learning. |
| Kinesthetic (Muscle) | The physical feeling of singing the notes and moving the body. | Practice difficult passages on a line by line basis. DO NOT move on until the sound is what you expect it to be. Remember, you get a brighter sound with a wide mouth exaggerated facial smile. Walking or moving helps you to remember even when distracted. |
Best Practices for Practice Sessions
| Practice Tip | Description | Benefit |
| Set SMART Goals | Define what you will accomplish in a session (e.g., ‘Master the bridge and the final chorus transition’), not just ‘Practice the song.’ | Ensures focused, deliberate effort and measurable progress. |
| Use a Metronome | Always practice difficult rhythmic passages with a metronome, even if you are singing a cappella. | Builds a rock-solid internal sense of rhythm and tempo stability. |
| Stay Hydrated | Keep water nearby. Vocal health is paramount to effective practice. | Prevents vocal fatigue and strain, allowing for longer, more productive sessions. |
| End on a Win | If you are struggling, stop. Have a break, hydrate, listen to the whole song. Go back to the tricky line, learn it word by word and end the session on a perfect repetition. | Reinforces positive neural pathways and maintains motivation for the next session. |
By applying the principles of deliberate practice, multi-modal memory and the VSL Harmonic Identity Accelerated Song Learning Method, you will find that even the most challenging songs become manageable, allowing you to build a reliable and impressive repertoire quickly.
Review:
Never try to learn a full song in one go.
Break the song into:
- Short phrases
- Individual lines
- Specific problem areas one word at a time.
Learning happens faster when the brain feels safe and focused.
Learn Without Singing First
Before singing, listen carefully.
Mimic the singer, then explore your Harmonic Identity when you know the song well. This removes pressure and allows your brain to map the song efficiently.
Slow Practice
Speed hides mistakes.
Always listen to the timing and chords. Focus on accuracy, breathing and tone.
Once control is established, speed can be added naturally.
Stop at the hardest line or phrase.
Repeat it gently five to ten times. Rest briefly. Do not move on until you are happy with your sound. Not only will you remember that line perfectly, you can then move on to apply your own voice and style.
This targeted approach saves time and protects the voice.
Visualise yourself singing the song. Hear it internally. Feel the breathing and phrasing. When you practice out loud, aim to apply your VSL Harmonic Identity learning to the song.
Mental practice strengthens learning even when you’re not physically singing.
Common Learning Mistakes
- Singing full volume too early
- Repeating mistakes
- Practising while tired
- Skipping difficult sections
Daily Practice Recommendation
Short, focused practice sessions are more effective than long, unfocused ones.
Ten to twenty minutes of deliberate practice produces faster results than hours of repetition.
Following this simple smart learning, you can learn a song in one hour.
Lesson Reflection
After applying this method, notice how quickly songs settle into your voice.
This learning system can be applied to any song, at any level, giving you confidence and control over your progress.
In the following lessons, we’ll combine efficient learning with t
How to Stand for Better Singing Posture
Effective posture is not about looking correct. It is about allowing the voice to work without interference. Many vocal issues that appear to be technical or breath-related are actually posture problems in disguise. A balanced posture means far less effort and more reliability. Thus, clearer freer phonation.
So, effective posture is a dynamic, balanced state of readiness that allows the body to move freely and efficiently in support of the voice. The right stance for the right sound, as a vocalist, is part of the profound internal mechanism that dictates your breath capacity, resonance and the overall health of your vocal instrument.

This lesson will show you how posture directly affects sound and how subtle, often surprising and overlooked adjustments, can transform vocal quality while protecting long-term vocal health. Promoting vocal freedom and a richer sound.
1. Posture and the Voice: The Real Connection
Your breath powers your phonation. Your body controls your breath. Breathing patterns become disrupted if posture collapses or becomes rigid, . The journey to a powerful sound begins not in the throat, but in the connection between your body and the ground. So let’s start from the feet upwards.
The Surprising Role of the Feet and Grounding
The Power of the Tripod Foot
The way you distribute your weight on your feet directly influences the stability of your core, which is the engine of your breath support.
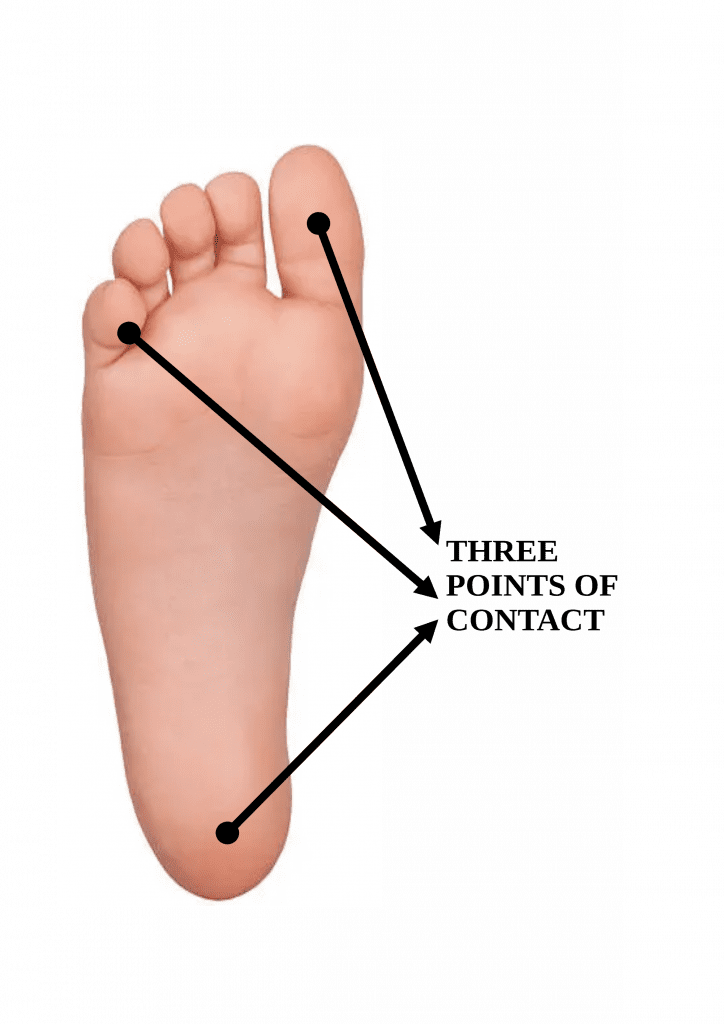
The Three Points of Contact: Imagine a tripod under each foot, with contact points at the base of the big toe, the base of the little toe and the centre of the heel.
- When your weight is evenly distributed across these three points, your arches are naturally engaged and your ankles and knees are aligned.
- The Unlocked Knee: A surprising source of vocal tension is the locked knee. When the knees are locked, the pelvis tilts, the lower back arches and the entire torso becomes rigid. This rigidity actually affect the fluidity of your voice. By keeping your knees soft, slightly bent or unlocked, you allow the pelvis to remain neutral and the breath mechanism to operate freely to project your sound. Try it. Sing a song with a high note. As you hit the high not, unlock or bend your knees. It becomes more effortless. Now you know why your favourite professional singers do that.
- The Weight Shift Exercise: To feel the three points of contact dynamic balance, try shifting your weight slowly from the balls of your feet to your heels and then side-to-side. Find the central point where you feel most stable and least effort is required to stand. This is your optimal stance for singing.
Effective posture allows:
- Natural, responsive breathing
- Reduced throat and jaw tension
- Improved resonance and tone
- Greater vocal stamina
Good posture is not stiff or held. It is alive, flexible and responsive.
2. Why ‘Good Posture’ Often Causes Problems
Many people are taught to pull their shoulders back, lift the chest, and lock the body upright. While this may look confident, it often creates unnecessary tension.
Surprisingly, forcing posture can restrict the ribs, limit breath flow and disconnect the body from the ground.
Instead of holding posture, aim to allow alignment.
3. Building Posture from the Ground Up
Effective posture starts at the feet.
- Stand with your feet about hip-width apart
- Allow your weight to be evenly distributed
- Keep the knees soft and unlocked
From here, let the pelvis rest in a neutral position – not tipped forward and not tucked under. This creates space for natural breath movement.
The ribcage should feel buoyant rather than lifted and the spine lengthened without effort.
Imagine the head gently floating above the spine, rather than being held in place.
Secret Tip
Now, ever so slightly, lean your spine backwards.
Why?
Stand and sing the first verse of your favourite song. Then, lay flat on you back and sing your favourite song. Notice how effortless it is now?
4. Releasing Hidden Tension
Poor posture often hides tension in the shoulders, neck and jaw.
Rather than forcing these areas to relax, allow posture to do the work:
- Let the arms hang freely
- Allow the shoulders to settle
- Release the jaw without effort
When posture is balanced, tension releases automatically.
5. Posture as Vocal Protection
We showed you that Effective Posture reduces vocal effort. Less effort means less strain on the vocal folds and greater consistency over time.
By removing physical obstacles, you allow your voice to function as it was designed to – freely, efficiently, and safely.
Effective Posture Checklist for Vocalists
This checklist focuses on the dynamic, subtle elements of effective posture that lead to optimal sound.
| Body Area | Effective Stance Principle | Why It Works (The Surprising Result) |
| Feet | Weight evenly distributed across the ‘tripod’ points. | Creates a stable, grounded foundation that prevents core rigidity. |
| Knees | Soft, unlocked and flexible. | Prevents tension that robs you of your correct phonation. |
| Arms | Hanging loosely and aiding the songs expression. | Clenched fists, folded or rigid arms, reflects in the phonation. Expressive confident arms work. |
| Pelvis | Neutral and balanced. | Provides a stable anchor for the abdominal muscles of breath support. |
| Spine | Elongated, not arched or rigid. | Creates maximum vertical space for the vocal tract and breath capacity. |
| Shoulders | Relaxed and hanging heavy. | Releases tension from the neck and throat, freeing the larynx. |
| Head | Balanced and floating on top of the spine. | Optimises the length of the vocal tract for maximum resonance. |
| Jaw | Loose, heavy, and unhinged. | Removes the primary obstacle to a full, rich, and open sound. |
By focusing on these points of release and dynamic balance, you will find that the ‘right stance’ is not a fixed pose, but a state of effortless readiness that allows your voice to resonate with its full, natural power.
Secret Tip
Stand correctly, as we have taught you. Now, begin singing the first verse of a song. As you sing, first tilt your head upwards without stopping your song. Then tilt your head towards your chin without stopping the song.
Notice how your sound drastically changes when the head and spine is not aligned.
Key Insight
You do not create better sound by pushing harder.
You create better sound by standing in a way that allows the voice to work naturally.
Posture is not separate from singing or speaking – it is part of your instrument.
How to Improve Vocal Control for Singing
Lesson Aim
To develop conscious control over breath (airflow) and vocal sound. So that the voice remains steady, free and responsive. Rather than forced, shaky, or breathy.
Vocal control is not about pushing or holding back sound. It is achieved through a precise partnership between two forces: the Air and the Voice. Simultaneous control means ensuring these two partners meet at the exact right moment and maintain a perfect balance throughout the sound.

1. The Air: The Fuel of Sound
The air is the energy source for all vocal sound. Control over the air is not about how much you breathe in, but how steadily you let it out.
- The Role of Air is to create a constant, gentle pressure beneath the vocal cords. This pressure is what makes them vibrate.
- The Control Point is through your core muscles, which are the diaphragm and abdominal wall. They must act as a Flow Regulator, resisting the natural tendency of the air to rush out. You achieve control by maintaining a gentle, outward resistance in your core as you sing, ensuring the air is released slowly and consistently.
2. The Voice: The Vehicle
The voice is the sound-making part-your vocal cords. Control over the voice is about precision in how the cords close.
- The Role of the Voice is to close just enough to resist the air pressure, converting the steady air flow into vibrating sound waves.
- The Control Point is the vocal cords themselves. Importantly, they must close cleanly and completely for a moment in each vibration cycle.
Understanding the Relationship Between Air and Sound
Every vocal sound is powered by air. If too much air escapes, the voice sounds breathy or weak. If too little air flows, the voice becomes tight, strained, or unstable. True control happens when airflow and sound move together, neither overpowering the other.
Think of air as the fuel and sound as the vehicle. Too much fuel floods the engine. Too little and it stalls.
Step 1: Establish Controlled Breathing
- Stand or sit upright and apply the VSL Harmonic Identity warm up, posture and we will proceed with the controlled breathing.
- Place one hand on your lower ribs, so that you feel your body’s response to your breathing.
- Inhale silently through your pursed lips as if sucking through the straw for five seconds. Allow your ribs/diaphragm to expand up and outward.
- Exhale slowly by blowing through the imaginary straw for five seconds. Your ribs/diaphragm will lower, falling inwards.
- Repeat this exercise, aiming for consistency rather than length.
This exercise teaches you to regulate airflow without sound, which is essential before adding the voice.
Step 2: Add Sound to the Air
Now repeat the same breath, but this time exhale on a ‘Hah’ sound.
- The sound should feel easy and steady, as if relieved
- No wobbling, pushing, or fading
- You should feel the sound vibrate in you chest, which should stay relatively still
This connects breath flow directly to vocal sound.
Step 3: Sustain Vowels with Control
By now, you should be able to imagine that the ‘Hah’ could be any note and thus the ‘Hot Potato’ is controlling the flow of the air or song.
Focus on:
- Choose a comfortable pitch and sustain ‘Hah’ ‘Hee’, then ‘Hah’ ‘Hoo’
- Even airflow
- Steady volume
- No tightening in the throat or jaw
- Each time you say the note, air will be controlled outward and the abdomen area will pull in.
- Practice this until it is comfortable and easily done. It may not be straight away, but continue until you perfect this exercise.
If the sound shakes or fades, adjust the air—not the throat.
Step 4: Apply Control to Simple Phrases
Sing or speak a short phrase (e.g., “I am learning control”) on one breath.
- Maintain airflow through the entire phrase
- Avoid dropping volume at the end
- Let the breath carry the sound naturally
- Add in the beginning to your favourite song, as you become more proficient.
Common Mistakes to Avoid
- Holding the breath before singing
- Pushing air to ‘make’ sound
- Tightening the throat to control volume
- Not controlling the air before the sound
Control comes from breath management, not tension.
Practice this lesson for 10–15 minutes daily. Progress is felt as ease, not effort.
When air and sound work together, the voice feels stable, flexible and free.
Key Takeaway
All VSL Harmonic Identity Lessons are precursors to singing. In this short lesson, the key to your completing it and mastering the vocal control, is to approach it as if you are singing. If you are attempting this lesson before the recommended one, then you may not achieve what you are supposed to.
Singing Tips and Tricks for Beginners
Lesson Purpose
This taster lesson is designed to reveal how small technical adjustments can produce dramatic vocal improvements. Many singers struggle not because they lack talent, but because they are missing a single key understanding. These tips focus on efficiency, not effort.
VSL Harmonic Identity provides the solutions to your vocal difficulties. Think of this lesson as a precursor to a Question and Answer session.
We are providing some of the answers to questions that singers struggle with and didn’t want to take a course of lessons to find out. Or perhaps, you will find out that you were doing something wrong all along and the fix just took a minute.
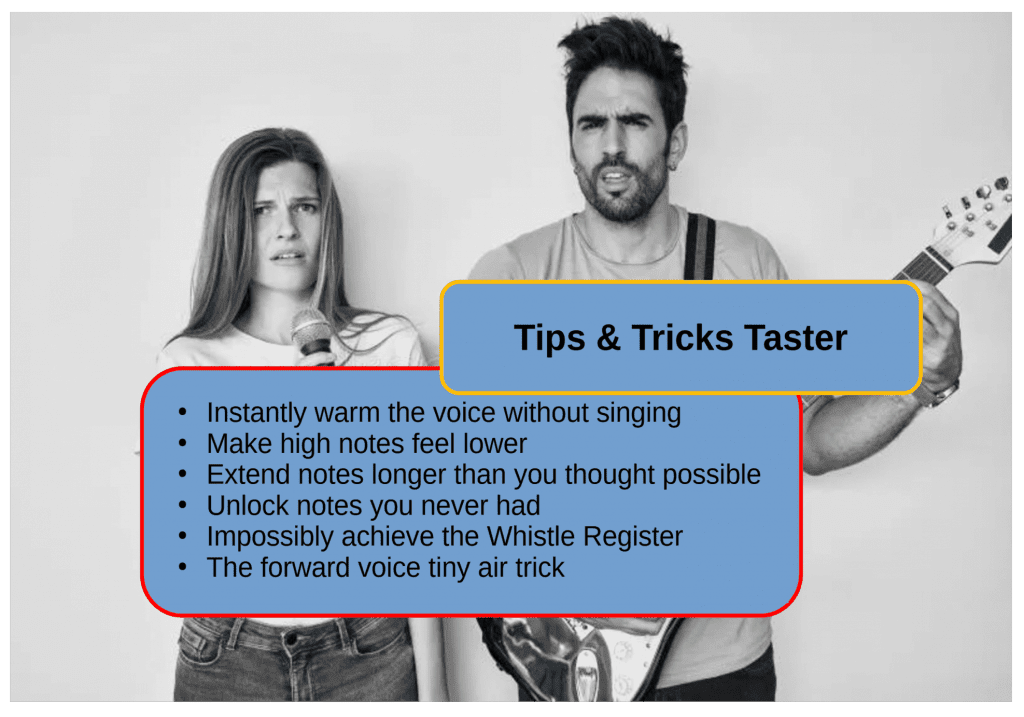
1. Instantly Warm the Voice Without Singing
To see how quickly that you can turn your voice around, sing a verse from a song and then do the same again after this exercise. The difference is mind blowing.
What you can achieve quickly:
A ready, responsive voice in under 60 seconds.
How:
- Firstly, imagine a Polo mint
- Next suck air into your throat, as if sucking air through the hole in the polo mint
- Then make sure that your mouth is wide and that there is much air flowing and cooling your throat
- Keep volume low and airflow steady
- Repeat as many times as you want to, but seven times in plenty.
This wakes up vocal resonance without strain and avoids the common mistake of ‘singing to warm up.’ Remember to hydrate with non fridge liquids.
2. Stabilise Shaky Notes in Seconds
What you can achieve quickly:
Immediate steadiness on sustained notes.
How:
- Slightly narrow the vowel (e.g. ‘ah’ toward ‘uh’)
- Alternatively widen your mouth towards a smile.
- Reduce air pressure instead of pushing more
- Works with any word. Try it.
Most instability is caused by excess air, not lack of support.
3. Make High Notes Feel Lower
What you can achieve quickly:
Less fear and tension on high notes.
How:
- Hum a succesion of notes upward and then back down
- Then go up an octave doing the same thing as above
- Keep humming the notes, going upward and then back down. Each time going an octave upwards, until, you hopefully realise you have been humming the elusive high note all along without realising it.
- Now sing that note and when you are able to, add it to your song
The body often tightens in anticipation. Singing a note without realising it, removes the block.
4. Increase Volume Without Strain
What you can achieve quickly:
A fuller, louder sound with no throat effort.
How:
- Imagine air swirling in your mouth as you breath out
- Let the breath widen as you widen your mouth
Power comes from resonance space, not force.
5. Extend Notes Longer Than You Thought Possible
What you can achieve quickly:
Longer phrases on one breath.
How:
- Breath in. Slowly allowing the lower ribs to expand and lift upwards. Keeping your chest relatively still.
- Next, slowly release the air, allowing the lower ribs to deflate downwards and in.
- Repeat this a few times to get the feel of it
- Then, when you breath in, feel the abdomen area/torso fill up, but also make sure that your lower ribs go up and out.
- Now, as you slowly release the air, sing the note outwards with the air
- Empty the air around the ribs first, then the air from the abdominal area/torso
Control is about air pacing, not lung size. You double the capacity of air, thus note length.
6. Instantly Improve Tone Quality
What you can achieve quickly:
A clearer, brighter, more pleasant sound.
How:
- Smile slightly with the eyes, or widen the mouth to a wide smile
- Allow cheekbones to lift
This subtly changes resonance placement without changing technique.
7. Reduce Vocal Fatigue Immediately
What you can achieve quickly:
Sing longer with less tiredness.
How:
- Lower volume by 10%
- Sing with swirling airflow in the mouth
Fatigue often comes from micro-tension, not overuse.
8. Unlock Notes You’ve ‘Never Had’
What you can achieve quickly:
Access to notes previously thought impossible.
How:
- Approach the note quietly first
- Remove volume and add it later
Range expands through coordination, not force. Not advisable for the highest notes.
9. Fix Breathiness Fast
What you can achieve quickly:
A more focused sound in minutes.
How:
- Add a ‘Q’ before your words
- Do so until it becomes inaudible, but you continue the process
These sounds automatically balance airflow.
Achieve the Impossible
The following two techniques are often considered ‘impossible’ because they require extreme coordination, precise muscle engagement, and a deep understanding of vocal anatomy. Extreme caution and professional guidance are advised when exploring these areas, as improper execution can lead to vocal fatigue or injury.
10. Achieve The Whistle Register (The Highest High)
The whistle register is the highest vocal register, produced when only the very edges of the vocal folds vibrate, often creating a sound similar to a flute or whistle.
- The Yawn-Sigh Method: Start with a silent, exaggerated yawn. As you sigh out, let a tiny, breathy sound escape. Slowly raise the pitch of this breathy sound, keeping the throat wide open. Keep repeating and going an octave higher each time.
11. The Tiny Air Trick
Singing ‘Hahhhhh.’ Imagine you are blowing a tiny stream of air through a pinhole. The sensation is one of minimal effort and maximum focus on the very front of the vocal mechanism. Avoid pushing from the diaphragm; the sound is generated by the resistance of the folds, not the force of the air. You are now achieving ‘Forward voice.’
Closing Insight
Many vocal breakthroughs happen not when something new is added, but when something unnecessary is removed. These tips work quickly because they focus on coordination, not conditioning. Contact VSL for precise help where you need it, instantly.
This taster lesson is not about perfection. It’s about showing what is possible – fast. – From Instant Warm-Ups to Mastering the ‘Impossible’
Lesson Purpose
This taster lesson is designed to reveal how small technical adjustments can produce dramatic vocal improvements. Many singers struggle not because they lack talent, but because they are missing a single key understanding. These tips focus on efficiency, not effort.
VSL Harmonic Identity provides the solutions to your vocal difficulties. Think of this lesson as a precursor to a Question and Answer session.
We are providing some of the answers to questions that singers struggle with and didn’t want to take a course of lessons to find out. Or perhaps, you will find out that you were doing something wrong all along and the fix just took a minute.
Enjoy…
How to Sing in Tune Beginners Guide: Voice Tuning
Simple, Quick and Effective Ways to Practise Tuning Every Day
Lesson Purpose
Voice Tuning, also known as intonation, refers to the adjustment of pitch in speech or singing to achieve desired melodic patterns and convey meaning. The ability to accurately match pitch and maintain it consistently, aligns with how well a voice is tuned.
The ability to align your voice with the exact frequency of a musical note, contrary to popular belief, is not something you either ‘have’ or ‘don’t have’. It is a trainable coordination between the ear, the breath and the vocal mechanism. The starting point can be a very consistent tuning ability, but most vocalists do not have that ability.
As with all sound made from the voice, to stay in tune, your vocal cords must adjust their length and thickness (depth) to match specific notes. Vocal tuning is a physical skill involving Auditory Pitch Calibration and muscle memory.
This lesson starts from the premise that most pitch issues are mechanical rather than a ‘bad ear’. Expect us to provide you with a structured approach to practising tuning every day in a way that is simple, quick and highly effective. The lesson is designed to dramatically improve pitch accuracy very quickly. The goal is not perfection, but reliability.

Understanding Voice Tuning
Every sung note is guided by two systems working together:
- The ear, which recognises pitch
- The voice, which reproduces it
If either system is unclear, tuning suffers. Most tuning problems come from:
- Poor pitch reference of understanding the required note.
- Inconsistent air placement, thus a poor output.
- Excess vocal tension, due to having no proper technique.
Tuning improves fastest when the voice is warmed up and breathing is proper.
Step 1: Reset the Ear Before Singing: The ‘Listen-Visualise-Align’ Method
Before making sound, take five minutes go through your VSL Harmonic Identity warm up and breathing exercise. Then, play a single note on a piano, keyboard, tuning app, or music track.
Listen carefully for a couple of second
Mentally ‘hear’ the note internally
Do not sing yet
This aligns the brain with the pitch before the voice engages.
Before you sing a note, you must ‘hear’ it in your mind. This is the core of Auditory Pitch
Calibration.
- Listen: Play a reference note (piano, guitar, or app). Focus on the ‘centre’ of the sound.
- Visualise: Imagine the note as a physical point in space. ‘See’ your voice hitting that point.
- Align: Sing the note using short phrases such as ‘Hah’ ‘Hee’ ‘Hoo’. If you hear a different note.
Stop, listen, visualise and align. The process takes only as long as it takes to say it. You are slightly off if you are hearing two notes, or you are clashing with the required note. When the vibrations feel smooth and ‘locked in,’ you are perfectly in tune.
Step 2: Match Pitch Using Humming
Hum the note gently for two seconds.
Keep volume low
Allow vibration in the lips and face
Avoid adjusting after starting
If you miss the note, stop, listen again and retry. Do not slide to the pitch, aim directly for it. Conversely, if you cannot recreate the note, no matter how you try, hum the note that you are able to, then slide from that note to the desired one. That is a secret trick that works.
Humming removes excess air and tension, making tuning easier.
Step 3: The Tuning Song
VSL could give you complicated ways to tune your voice, but we will not. Instead, we encourage you to learn the most perfect tuning song we know.
‘When you know the notes to sing, you can sing most any thing’
So-do-la-fa-mi-do-re-so-do-la-ti-do-re-do.
This is taken from the film The Sound of Music.
What they don’t show in the film however, is the placement of your mouth and the air. Nor do they explain the connection between what you practise and how to achieve the tuning. The synergy is what perfects the exercise. Remember, always air before sound.
Step 4: Sustain and Stabilise
Hold the note for 5-8 seconds.
Maintain a steady airflow
Keep your posture relaxed
Avoid volume changes
If your pitch sounds unsteady, stop and try again.
Step 5: Vowel Accuracy Check
Sing the same note on different vowels:
‘oo’, ‘ee’, ‘ah’.
Notice which vowels pull sharp or flat.
This awareness alone dramatically improves tuning, because certain vowels naturally distort pitch if not managed. The vowel are good for practising higher notes. Always air before sound. Use the letter ‘H’ in front of your vowels to achieve accuracy and better placement of air.
Step 6: Interval Awareness
Sing two notes in sequence (for example: Do-Re).
Hear the distance between the notes
Sing slowly and cleanly
Avoid guessing
Intervals train relative pitch, which is essential when singing real songs.
Step 7: Phrase Tuning
Sing a short phrase slowly.
Begin each note cleanly and for accuracy complete the ‘Singers Alphabet Lesson’.
Hold airflow steady through consonants
Do not drop pitch at the end
Most tuning issues occur at phrase endings, not beginnings.
Daily Practice Structure (5-10 Minutes)
1 minute listening and humming
2 minutes with the Tuning Song
3 minutes sustaining notes
2–3 minutes applying to phrases
Short, consistent practice beats a long session.
Pro Tips for Faster Progress
Record and Review: Your voice sounds different inside your head. Record your practice and listen back to identify where you tend to drift.
Vowel Selection: If you struggle with high notes being flat, when practising, use ‘Ee’ or ‘Ooh’. If low notes are sharp, use ‘Ah’ or ‘Uh’. Place the ‘H’ in front for accuracy.
The ‘Hand-to-Ear’ Trick: Cup your hand behind your ear to hear your ‘true’ external sound more clearly while practising or place your finger in your ear, to hear your ‘true’ internal sound more clearly.
Avoid ‘Scooping’: Many singers slide up to a note. Practice ‘attacking’ the note directly from silence to build better accuracy. (Remember when you can safely and accurately slide, as explained above)
Key Takeaway
Tuning is a sensation. Once you feel the resonance ‘lock’ with the reference note, you will automatically remember that physical state with consistent practise.
Common Tuning Problems and Fixes
Flat singing: Not enough energy or airflow, so refer to your ‘Breathing Techniques Lesson’.
Sharp singing: Too much tension or anticipation, so deep breath using ‘Straw in a Balloon method’
Inconsistent tuning: Poor pitch reference
Closing Insight
Good tuning is not about having a ‘perfect ear’. It’s about placement of air, ear accuracy and consistency. When the ear is focused and the voice is free, accurate tuning becomes natural.
Practise a little every day and tuning stops being something you worry about and starts becoming something you trust.
- Breath Control & Support
- Stage Fright Tips For Singers
- Vocal Scales For Beginners
- Vocal Warm Ups For Beginners
- How To Practice Songs Effectively
- Better Singing Posture
- Improve Vocal Control For Singing
- Singing Tips & Tricks
- How To Sing In Tune
