Diction For Singing & Speaking
Diction for Singing & Speaking Skills: Pronunciation
Pronunciation that accentuates your phonation is far more than just clarity of words. In both singing and speaking, effective diction works with the voice, not against it. Phonation becomes enhanced, with well balanced pronunciation. It also improves tone and allows sound to travel freely. Forced or exaggerated diction disrupts airflow and interferes with your sound.

The act of vocalising is a two-part process: Phonation, which is the creation of sound at the vocal folds and Articulation, which is the shaping of that sound into intelligible language).
Diction, the clarity and precision of your pronunciation, is the bridge that connects these two.
When diction is poor, the listener struggles to understand the message. The conveyed message suffers.
This lesson explores how mastering the physical mechanics of pronunciation. We introduce articulators, the power house of our Singers Alphabet Lesson. Correct use of articulation, can directly enhance the quality, resonance and ease of your phonation. Leading to a more powerful and communicative vocal performance in both singing and speaking.
VSL Harmonic Identity will help you understand how to use diction intelligently. So that pronunciation supports your sound instead of fighting it.
1. What Diction Really Is
Diction is the way we shape sounds using the articulators: the lips, tongue, teeth, jaw and soft palate. These structures sit on top of phonation, the vibration of the vocal fold and must never interfere with it.
Good diction is efficient, not dramatic. The goal is clarity with ease.
When diction is balanced:
- Words are clear and intelligible
- Tone remains free and resonant
- Breath flow stays uninterrupted
- The voice feels effortless
- The hearer is edified with understanding, because of clarity.
2. The Relationship Between Diction and Phonation
Phonation occurs at the level of the vocal folds, driven by breath. Diction happens above this level.
Problems arise when articulation becomes heavy or rigid. Overworking the lips, jaw, or tongue creates resistance that the voice must push through. Often resulting in strain or loss of resonance.
Surprisingly, less movement often creates more clarity.
Efficient diction allows sound to pass through cleanly, accentuating phonation rather than masking it.
3. Vowels: The Core of Sound
Vowels are the sustained sounds in language and they are the primary carriers of the vocal tone and resonance.
A pure vowel is formed with minimal tension in the jaw and tongue. Allowing the sound wave to resonate freely in the vocal tract. When the tongue is retracted or the jaw is tight, the vowel becomes distorted and the resonance is dampened.
In singing, especially in the higher range, the natural shape of a spoken vowel may need to be subtly adjusted. Or modified, to maintain a consistent open vocal tract. This is not about changing the word, but about slightly altering the vowel shape to prevent strain and maintain the desired vocal quality across the entire range. The secret is to keep the pharynx open while still communicating the intended word.
You will achieve perfect results sing the Hot Potato Technique, along with the exaggerated wide smile and Singers Alphabet.
Practice each vowel, putting a ‘H’ ‘Hay’ before each letter. It will become, ‘Hay’ ‘Hee’ and so on.
| Vowel Type | Primary Articulator Action | Impact on Phonation |
| Front Vowels (e.g., ee as in ‘see’) | Tongue is high and forward. | Can lead to a brighter, more focused sound, but requires a relaxed jaw to avoid thinness. |
| Back Vowels (e.g., oo as in ‘too’) | Tongue is low and back, lips are rounded. | Naturally creates a darker, more resonant sound, but can lead to a ‘swallowed’ tone if the tongue is too far back. |
| Central Vowels (e.g., ah as in ‘father’) | Tongue is flat and relaxed. | The most open vowel, often used as the default for maximum resonance and vocal ease. |
The Consonant: The Accelerator of Clarity
Consonants are the sounds that interrupt the flow of air, providing the clarity and rhythm of the language.
Vocal Release: Consonants, particularly plosives (p, t, k, b, d, g), require a momentary stop and release of air. This release can be used strategically to ‘reset’ the vocal mechanism, ensuring the following vowel is attacked cleanly and with proper breath support.
VSL Harmonic Identity uses the Eugene Technique to group consonants by the way they are sounded in the mouth.
M-B-P-F-V are used by the Labials and are deemed pronounced properly when there is no popping of sound. Especially when using a microphone.
So, M and F would be pronounced ‘Hem’ and ‘Hef’. B-P-V would be approached with a wide smile and no smacking of the lips. With practice, you will be able to use the consonants in your song and the added pronunciation will be undetectable.
Explore this fully in the Singers Alphabet Lesson if you haven’t done so already.
The Agile Tongue and Lips
The tongue is the most powerful and versatile articulator. Its agility is key to clear diction.
Consonants, such as t, d, l, n, are formed with the tip of the tongue. Practising rapid, light movements of the tongue tip against the alveolar ridge (the gum line behind the upper teeth) can dramatically improve clarity without adding throat tension. Always with the Hot Potato Technique and Wide Smile until you are proficient enough for it to be undetectable.
Lip Engagement: The lips are essential for forming labial consonants (m, p, b, f, v) and for shaping rounded vowels. We can’t stress enough, that engaging the lips without popping is important. Also contributing to the overall resonance and clarity.
4. Diction and Phonation: A Unified Approach
The ultimate goal is to integrate precise diction with free phonation, so that pronunciation accentuates the vocal tone rather than detracting from it.
Practical Diction Exercises
To develop the necessary agility and precision, incorporate these exercises into your daily vocal routine:
Tongue Twisters: Practice tongue twisters slowly and deliberately, focusing on the precise movement of the tongue tip and lips. As you maintain clarity, gradually increase speed.
Consonant Isolation: Practice rapid-fire repetition of specific consonant groups (e.g., ma-ba-pa-fa-ga) on a single breath. Ensuring the Harmonic Identity Technique.
Vowel Tuning: Breath in (Straw and Balloon) and using that controlled breath, cycle through the five pure vowels (hay, hee etc. ah, eh, ii, oh, oo) Focusing on maintaining a consistent, open vocal quality while only changing the shape of the tongue and lips.
Enure you speaking or singing contributes to the beauty and power of your phonation. Treat diction as an integral part of your vocal technique not as a separate skill.
Key Takeaway
Diction should highlight your sound, not fight it.
When pronunciation works in harmony with phonation, your voice becomes clearer, stronger and more expressive – without added effort.
Diction is not about exaggeration. It is about intelligent coordination.
How to Control Vibrato In Singing
How to Control Vibrato in Singing
Introduction
Vibrato is a natural, healthy oscillation in pitch that occurs when the voice is properly supported by controlled air placement. It adds warmth, richness, and emotional depth to your singing.
However, many singers struggle with one of three common issues:
-
No vibrato at all (a straight, tight tone)
-
An unstable or shaky vibrato
-
A vibrato that is too wide or uncontrolled

The goal of this lesson is to understand how vibrato works, learning how to control it naturally and consistently.
Vibrato — that natural, wave-like quality in the voice — can add beauty, warmth and depth to your sound when used with intention. But when it shows up uninvited or feels out of control, it can distract from your performance and make your tone sound uncertain.
In this lesson, we focus on taking control of the “warble” in your vocal renditions. You’ll learn to recognize when vibrato is helping you and when it’s taking over. Through focused exercises and real-time feedback, we’ll teach you how to develop a deliberate vibrato — one that you can activate, adjust, or hold back depending on the style, emotion, or phrase you’re singing.
Whether your vibrato is too fast, too slow, too shaky, or just inconsistent, this session gives you the tools to refine and own it. With better breath support, muscle coordination, and pitch control, you’ll gain the freedom to express with precision and confidence.
This lesson is ideal for singers of all levels who want more stylistic control and a polished, professional sound.
What Is Vibrato?
Vibrato is a subtle, regular fluctuation in pitch — usually around 5–7 oscillations per second. It occurs when:
-
Breath support is steady
-
The larynx is relaxed
-
There is no unnecessary tension in the jaw, tongue, or throat
Healthy vibrato is a result of balance or equilibrium — not manipulation.
If you have to ‘shake’ your voice to create vibrato, it is not true vibrato. It’s tension pretending to be vibrato.
Step 1: Check Your Foundation
Before working on vibrato directly, confirm that:
-
Your breath support is stable
-
Your posture is aligned
-
Your throat feels open and relaxed
Sing a sustained note on “ah” for 8–10 seconds.
Ask yourself:
-
Does the tone feel steady?
-
Is the airflow consistent?
-
Is your jaw relaxed?
If the tone feels tight or pressed, vibrato will not develop freely.
Step 2: Develop Natural Vibrato
If you struggle with a straight tone and want to encourage vibrato, try this exercise:
The Pulse Exercise
-
Sustain a comfortable note.
-
Gently pulse the sound using abdominal engagement (not your throat).
-
Create small, even pulses: “ah-ah-ah-ah.”
-
Gradually smooth those pulses into a connected oscillation.
The goal is not to exaggerate the movement but to introduce rhythmic flexibility into the tone.
Over time, the vibrato should begin to emerge naturally.
Step 3: Control an Unstable Vibrato
If your vibrato feels too wide or shaky:
Stabilization Exercise
-
Sing a sustained note with steady breath support.
-
Focus on keeping the pitch centred.
-
Imagine the tone spinning evenly forward rather than wobbling outward.
-
Reduce excess airflow — too much air can cause a wide vibrato.
Often, an uncontrolled vibrato is caused by:
-
Excess breath pressure
-
Jaw or tongue tension
-
Fatigue
Less force usually creates more control.
Step 4: Practice Controlled Release
A powerful skill is choosing when vibrato begins.
Exercise:
-
Sing a note with straight tone for 2–3 seconds.
-
Allow vibrato to gradually emerge.
-
Then return briefly to straight tone.
This teaches flexibility and artistic control.
Professional singers can turn vibrato on and off intentionally — not by forcing it, but by adjusting breath flow and vocal balance.
Common Mistakes to Avoid
-
Forcing a wobble by moving the jaw
-
Shaking the diaphragm aggressively
-
Tensing the throat to “create” vibrato
-
Using too much air
True vibrato is a symptom of healthy technique — not a trick.
Applying Vibrato in Songs
When using vibrato in performance:
-
Add it at the ends of phrases for emotional emphasis
-
Avoid overusing it on every note
-
Match the vibrato style to the genre
Controlled vibrato adds expression. Uncontrolled vibrato distracts from the music.
Final Thoughts
Vibrato is not something you manufacture. It is something you allow.
With proper breath support, relaxation, and steady practice, vibrato becomes:
-
More stable
-
More refined
-
Fully under your control
The aim is freedom — not force.
Practice patiently, and focus on balance over power.
How To Sing Head Notes
Head Notes – How to Achieve High Notes Effortlessly
Lesson Purpose
Achieving high notes with ease is the ‘holy grail’ for many singers. The secret lies not in ‘trying harder,’ but in understanding the mechanics of the head note. Also, learning how to let the voice function naturally.
This lesson will guide you through the physiology, techniques and exercises needed to unlock your upper register. Additionally, you will learn to access higher notes with ease, stability and confidence. All without strain, pushing, or fear.
Many singers believe higher notes require more power, more breath, or more effort. In reality, higher notes require less weight, better balance and clearer coordination.
When head notes are produced correctly, they feel lighter than low notes, not harder.

Understanding Head Notes
Did you notice that we referred to the notes as ‘higher’ and not ‘high’?
The reason stems from the common misconception that high notes are too high to be achieved.
The truth is that they are just a bit higher than the last high note that you comfortably sang.
- Vocal Fold Stretching: In your lower register, which is the Chest Voice (think Adele), your vocal folds are short and thick. As you go higher, the cricothyroid muscles tilt the larynx, stretching the vocal folds until they are long and thin. Much like stretching a rubber band to get a higher pitch.
- In a head note, the vocal folds vibrate primarily along their edges. This requires less air volume but more precise control.
- The sound ‘resonates’ or vibrates in the cavities of your head (sinuses and skull), giving it a lighter, brighter and more ‘ringing’ quality compared to the ‘buzzy’ feeling of chest voice. (Think of choir boys)
By now you have learnt that a head note is not ‘in’ your head. Let’s carry on.
The most common mistake made, is trying to carry chest voice upwards. This adds too much vocal weight, forcing the throat to compensate, which creates strain and instability.
Ultimately, effortless high notes come from thinking about the note and then using our VSL Harmonic Identity Technique to allow the voice to change, not resisting it.
Step 1: Remove Weight Before Going Higher
Before attempting any high notes, reduce vocal weight.
- Start with the VSL Harmonic Identity warm up.
- Then using the hot potato start by humming lightly on a comfortable pitch
- Effortless high notes are powered by the breath, not the throat.
- Breathe. Your shoulders should remain still.
- The act of managing the air pressure, Appoggio, does not require that you need more air. During a head note, you need consistent air pressure. Imagine a slow, steady stream of air rather than a big blast.
- Practice hissing (like a snake) for 30 seconds. Notice how your abdominal muscles engage to keep the air steady. This is the same engagement needed for high notes.
- Allow the sound to feel narrow and focused, almost as if blowing the air through a a tiny straw
This prepares the voice to transition smoothly instead of pulling chest voice upward.
Step 1: Alternative
A quick alternative is achieved through Arpeggios.
Start on a low note and slowly glide up to a high note and back down, maintaining a consistent, supported air stream. As you glide, focus on the smoothness of the transition. Then, practice gliding from one specific note to another specific note (e.g., C4 to G4), stopping precisely on the target pitch. Begin at an Octave higher every few practises.
Notice that each time you go up an octave, you have already sung the previous highest note, so should effortlessly achieve it in the next octave. Thinking that it there are too many notes is in the mind.
Step 2: The Foundation: Access Head Notes Safely
Choose a comfortable mid-range note and glide upward on a gentle ‘oo’ or ‘ng’ sound.
- Do not aim for volume
- Let the pitch rise naturally
- Keep the throat relaxed and open
- Releasing tension is the key to ‘Effortlessness’
- Tension is the enemy of high notes. If your throat muscles ‘grab’ the note, it will sound strained and thin.
The Three Tension Zones
- The Jaw: Keep your jaw ‘hinged’ and loose. Avoid jutting it forward.
- The Tongue: The tongue is a large muscle attached to the larynx. If it bunches up or pulls back, it chokes the sound. Keep the tip of your tongue resting gently against your bottom teeth.
- The Larynx: Avoid ‘reaching’ for high notes by lifting your chin. Keep your neck neutral and imagine the note coming down to you rather than you reaching up to it.
If the sound becomes thin or breathy, slightly reduce airflow. If it feels tight, lower volume further.
Vowel Modification: The ‘Cheat Code’
When you sing higher, certain vowels become difficult to maintain. ‘Modifying’ them slightly allows the throat to stay open.
| Original Vowel | Modified Vowel (High Notes) | Why it Works |
| ‘Ah’ (as in Father) | Shifting toward ‘Uh’ (as in Up) | Prevents the throat from ‘splatting’ or narrowing. |
| ‘Ee’ (as in See) | Shifting toward ‘Ih’ (as in Sit) | Relaxes the tongue and opens the throat space. |
| ‘Oo’ (as in Food) | Shifting toward ‘Uh’ (as in Foot) | Keeps the resonance from getting ‘trapped’ in the back. |
| ‘Ae’ (as in Cat) | Shifting toward ‘Eh’ (as in Bed) | Reduces the ‘nasal’ strain. |
Step 3: Finding the Head Note
We’ve given you all the tool of preparation. Now let’s go:
- Sing a note, such as, ‘Gee’ (like ‘geese’) on a 5-note scale. The ‘G’ sound helps the vocal folds close, while the ‘ee’ encourages head resonance.
- Now sing ‘Gee’ to the tune of Somewhere Over the Rainbow. If you don’t feel as if you have connected. Go back to the beginning of the exercise and start again. It is important that you only and always practise air before sound.
- Sing the ‘Gee’ song again. This time pronounce the ‘Gee’ as ‘Ghee’, with the full force of the air behind the ‘h’. No shouting or loudness, just a steady song.
- Lastly, go up an octave at the beginning of the song. Think of the note before you begin and aim for the ‘choir boy sound’. That is the process of the head note and the bonus is, you also achieve the forward voice if this is done properly.
Step 4: Strengthening
- Pick a note in your head note. Sing it on a ‘Mum’ or ‘Bub’ sound. The ‘B’ and ‘M’ consonants help keep the larynx stable.
- Sing ‘Nay, Nay, Nay’ on a descending scale. This adds ‘bite’ and ‘ring’ to your head note, making it sound more powerful without extra effort.
- Once you reach a higher pitch:
- Maintain steady air
- Keep the mouth relaxed and a wide smile
- Allow resonance to move forward into the face
The sensation should feel easy, almost effortless, as though the notes are floating rather than being held.
Common Problems and Corrections
- Strain: You’re using too much weight – reduce volume
- Coughing: Coughing is a sign of displaced air. Please complete the Breathing Techniques Lesson before trying to complete this lesson.
- Breathiness: Too much air. Follow the Finding the Head Note exercises.
- Fear of cracking: Allow the transition. Attempt the note, cracks mean that you have tried, not failed. Start the practise from the beginning.
Practice Guidance
Practice head notes for short, frequent sessions rather than long drills. The voice learns high notes through repetition without tension, not endurance.
Closing Insight
Effortless high notes are not rare or special. They are a natural result of allowing the voice to function as it was designed to. When you stop forcing the sound and trust the coordination, head notes become reliable, free and expressive.
Learning Microphone Techniques
Microphone Technique: The Critical Link Between a Good Performance and you

Lesson Overview
In essence, a microphone does not improve a performance; instead, it reveals it. Furthermore, the microphone is an essential tool for every aspect of your performance. Specifically, it serves as the direct link between your voice and your audience. Because it functions as a transducer, it works to convert the acoustic energy of your voice into an electrical signal. Ultimately, good microphone technique ensures that the listener hears you clearly, without distortion, strain, imbalance, or struggle.
Therefore, proper techniques allow the microphone to remain unobtrusive. Leaving only the performance itself.
Mastery of microphone technique is not merely a technical skill. It is an essential component of any performance.
Ensuring that the audience hears the optimal quality, tone and balance of your voice. No matter how small or great the settings or situation that you are performing in.
To begin with, this lesson covers the essential principles of microphone setup. In addition, it provides a detailed guide on placement and advanced positioning techniques to enhance your live performance.
Understanding the Equipment: Types and Patterns
The Microphone’s Role
A microphone is a translator, not a judge. It converts air movement (sound waves) into electrical information. In fact, it does not understand emotion, intention, or effort. Only proximity, direction, and pressure.
Thus, your task is to work with its nature, not fight it.
To begin with, effective technique starts with a basic understanding of the tool itself.
Specifically, microphones are categorised primarily by their internal mechanism.
In addition, they are also classified by their directional sensitivity.
Microphone Types for Live Vocals
Selecting the right microphone directly influences sound quality and durability.
| Type | Mechanism | Primary Use Case | Key Characteristics |
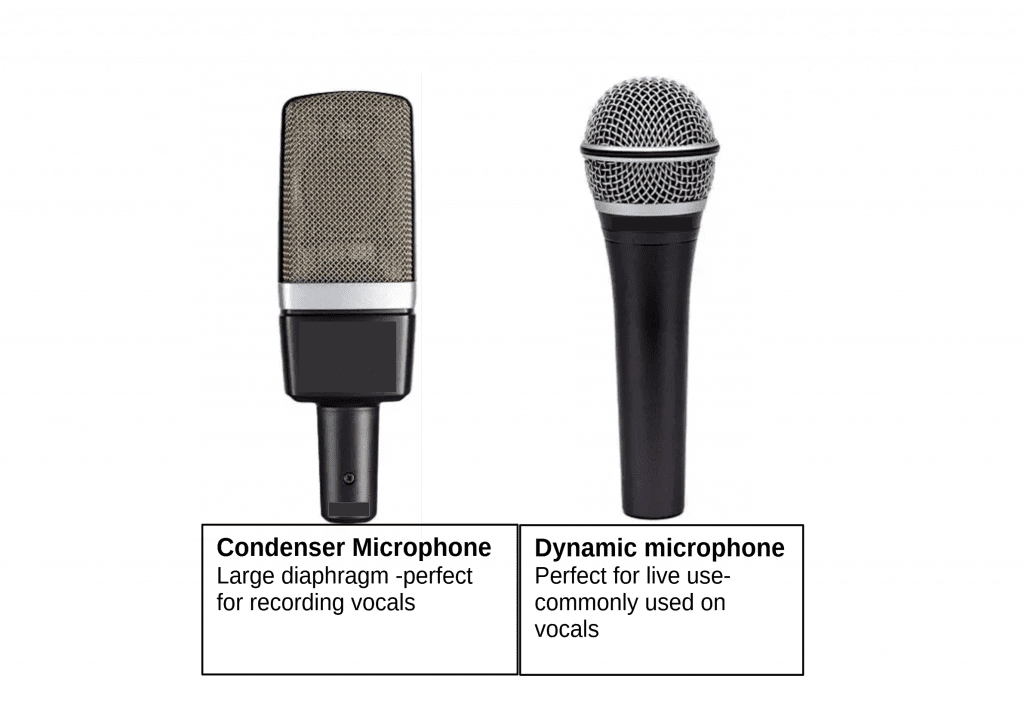
| Dynamic | Uses a moving coil and diaphragm to induce voltage. | Live performance, high-volume environments. | Rugged and durable; requires no external power; excellent for rejecting feedback. |
| Condenser | Uses a charged diaphragm and backplate (capacitor) to induce voltage. | Studio recording, acoustic instruments, delicate vocals. | Sensitive and accurate; requires phantom power; prone to feedback in loud live settings. |
For most live vocal and speaking applications, the Dynamic Microphone is the preferred choice. Reason being, durability and superior feedback rejection.
Directionality (Polar Patterns)
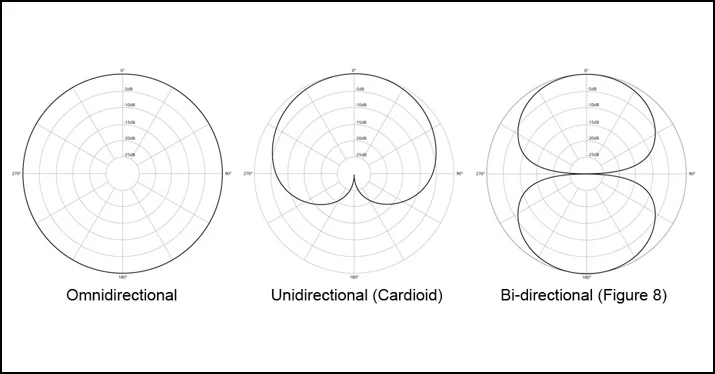
In essence, a microphone’s polar pattern describes its sensitivity to sound arriving from different angles. Specifically, understanding this pattern is crucial for isolating the voice. Ultimately, it plays a vital role in minimising unwanted stage noise.
| Pattern | Shape | Sensitivity | Live Performance Application |
| Cardioid | Heart-shaped | Most sensitive at the front; rejects sound from the rear. | Standard for live vocals; effectively isolates the singer from stage monitors and background noise. |
| Hyper-cardioid | Tighter front sensitivity with a small rear lobe. | Offers maximum side rejection; slightly more sensitive to sound directly behind the mic. | Excellent for very loud stages or when maximum isolation is required. |
| Omnidirectional | Circular | Picks up sound equally from all directions. | Not typically used for live vocals due to high risk of feedback. |
Setup and Assembly: The Physical Connection
1.Stand Adjustment
Clip or Shock Mount Positioning.
2.Cable Management.
3.Microphone Orientation.
Assembling the Microphone Correctly
Before sound, there is structure. The physical setup of the microphone and stand is the first step in ensuring a good performance.
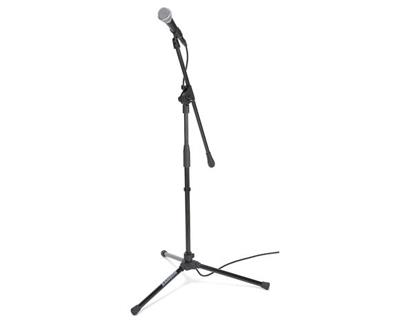
First Step: The Stand
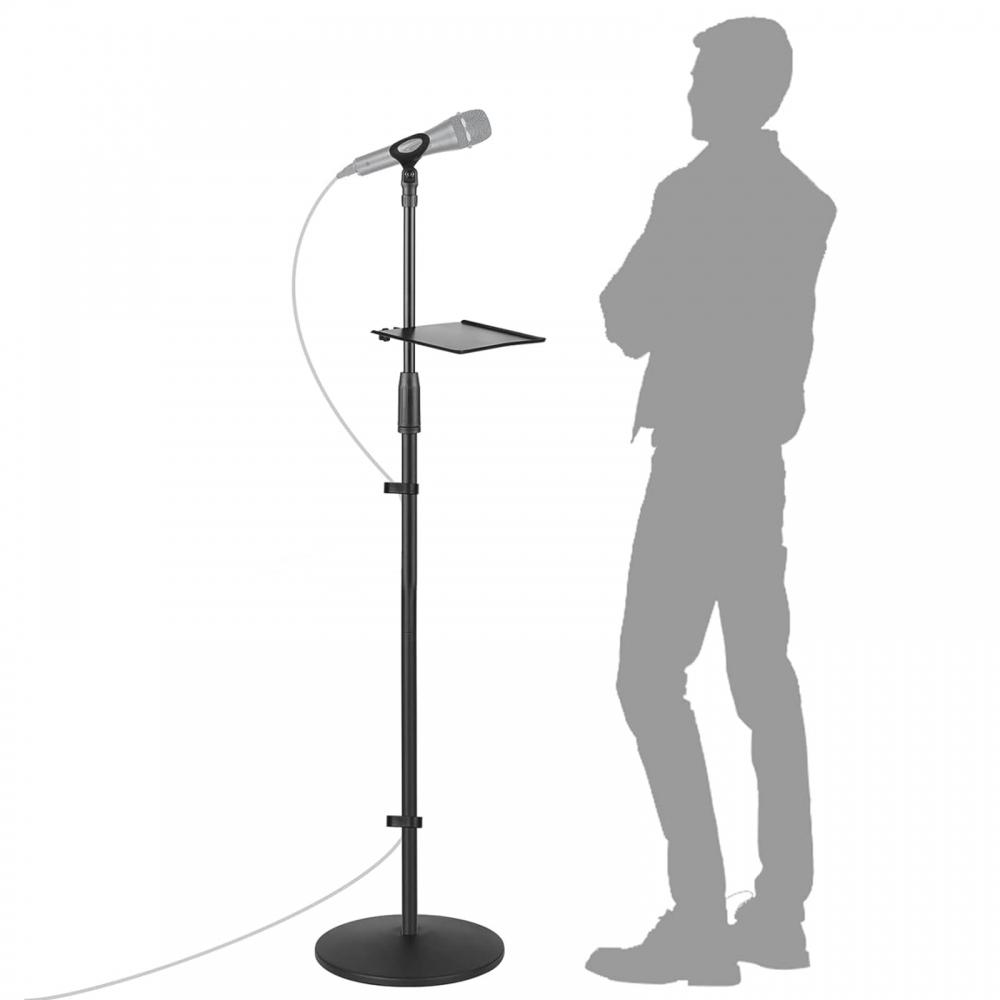
- Extend the stand to chest or mouth height.
- Next, attach the microphone carefully. The stand must be adjusted so the performer does not need to tilt their head up or down. Because tilting creates unnecessary tension in the neck and jaw. Which can compromise vocal quality and posture.
- Ensure the base is fully spread for stability.
- Tighten joints firmly, but not aggressively. Since over-tightening can damage threads.
Next Step: The Clip or Shock Mount
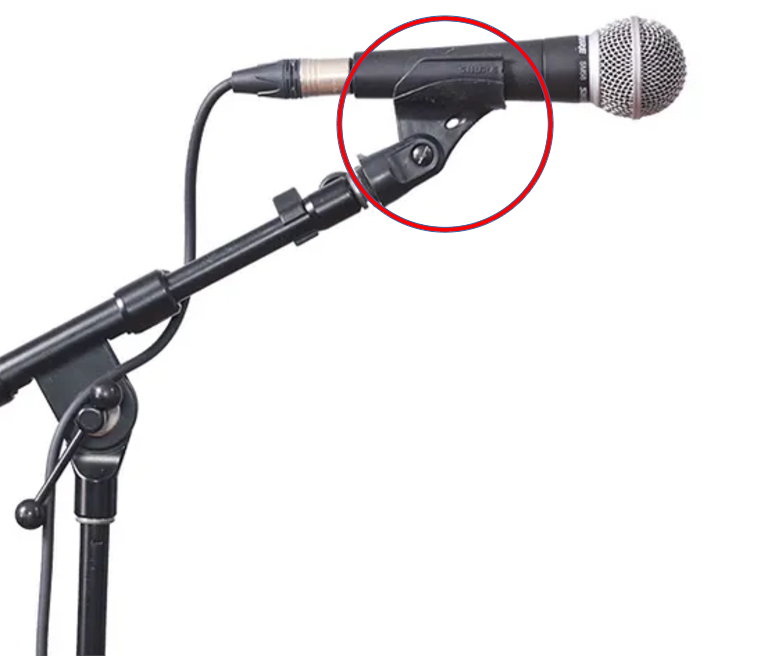
- Insert the microphone top-first, never force it.
- A shock mount is preferable for studio work. It isolates handling noise.
Next Step: The Cable
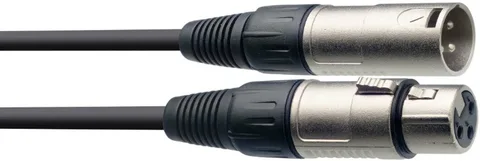
- First, press the XLR connector in, making sure it is firmly seated and locked.
- Next, ensure the XLR cable is securely connected and draped in a way that minimizes tripping hazards.
- Furthermore, this careful placement prevents accidental disconnection. If you are using the microphone for hand-held use, then you should leave enough slack for movement without pulling on the connection.
- Additionally, loop the cable once around the stand to provide strain relief.
- Finally, keep cables away from your feet to avoid vibration and accidents.
A stable microphone creates a stable performance environment.
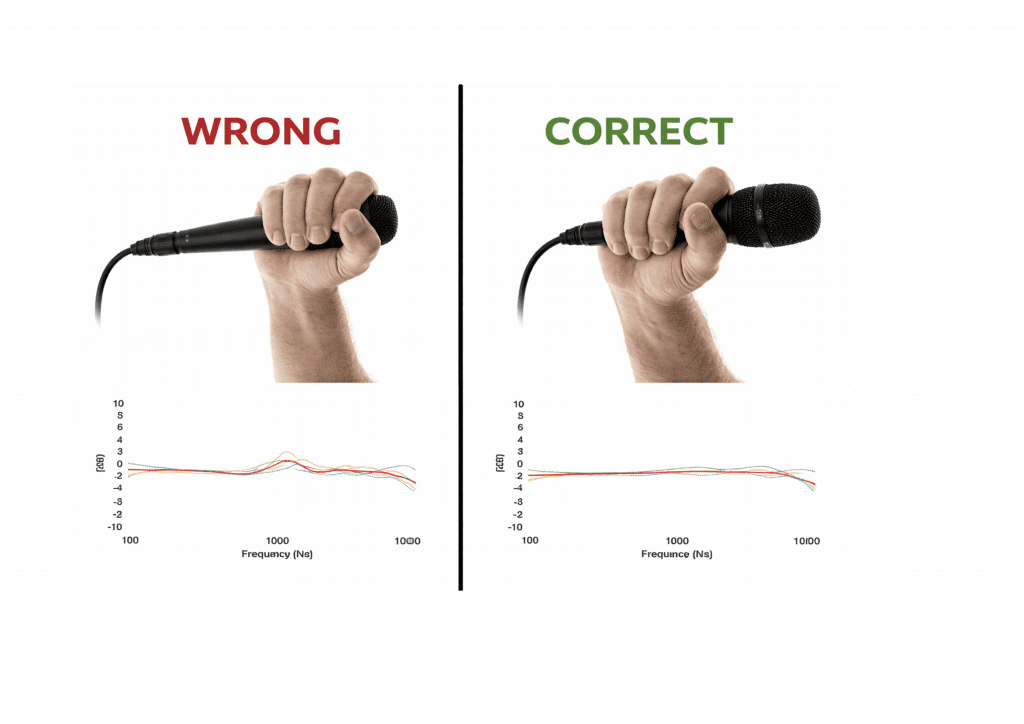
Final Step: Microphone Orientation

First, orient the microphone so that the capsule, or the grille, points directly at the mouth. Specifically, the mouth serves as your primary sound source. However, you should avoid singing across the top of the microphone. This is important because singing across the top causes the voice to pass over the pickup pattern. Consequently, this results in a thin and weak sound.
Advanced Positioning: The Three Critical Variables
Once the microphone is set up, the performer must master three variables: Distance, Angle and Consistency.
1. Distance and the Proximity Effect
- The distance between the mouth and the microphone is a powerful tool for controlling the voice’s volume and tone.
- The Proximity Effect: This phenomenon occurs when directional microphones (Cardioid, Hyper-cardioid) exhibit an increase in bass frequency response as the sound source moves closer to the capsule.
| Distance | Volume Control | Tonal Effect (Proximity Effect) | Technique |
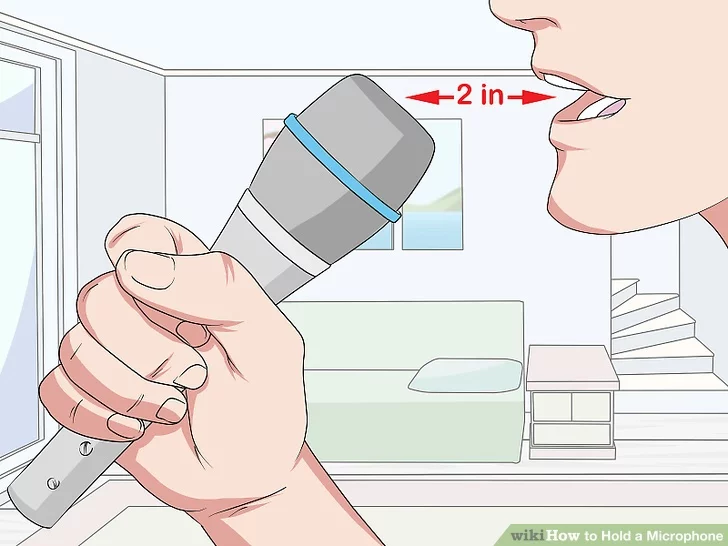
| Close (1-2 inches) | Maximum volume and sensitivity. | Increased bass and warmth (fuller sound). | Ideal for soft passages, low notes, or spoken word to add authority. |
| Mid (3-6 inches) | Standard working distance. | Neutral, balanced tone. | Ideal for average volume singing and speaking. |
| Far (6+ inches) | Reduced volume and sensitivity. | Thinner, less bass-heavy tone. | Use for very loud passages (shouting, belting) to prevent clipping and distortion. |
A skilled performer constantly adjusts the distance to manage dynamic range. Which, is a deliberate, controlled movement, not a dramatic flailing of the arm.
Distance controls tone, volume and warmth.
Standard Starting Distance
- 5–8 cm (2–3 inches) from mouth
What Distance Changes
- Closer: More warmth, more bass, higher risk of distortion.
- Further: Cleaner, thinner, safer but less intimate.
Learn to move dynamically:
- Lean slightly back on loud notes. Pull back slightly for powerful, loud notes.
- Lean slightly in on softer phrases. Move closer for soft, intimate passages.
This is called mic riding and it is a professional skill.
2. Angle Management
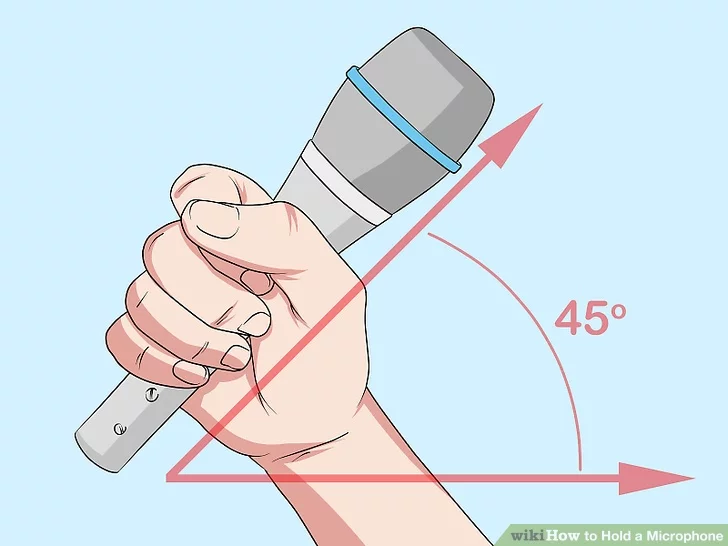
- The Centre Axis: Capture the most direct and powerful sound by placing the mouth directly on the microphone’s centre axis.
- The Off-Axis Technique: To reduce harsh plosives, position the microphone slightly off-axis (angled slightly away from the direct centre of the mouth), typically at a 30–45 degree angle. This allows the burst of air from plosives to pass effectively across the microphone capsule.
3. Consistency and Alignment
- Maintaining a consistent distance and angle is the hallmark of a professional, because inconsistent technique can lead to drastic and distracting changes in volume and tone.
- Use the microphone’s features, such as distance and angle, to regulate the sound. Never hold back or force your voice to compensate for poor microphone technique, as this can strain your voice and reduce clarity.
- When using a microphone stand, keep your head and neck in a neutral, aligned position. Practice keeping the microphone fixed relative to your mouth, even as you move your body.
Always use VSL Harmonic Identity Singers Alphabet Lesson as your secret weapon to a pure microphone output.
Identifying the Front of the Microphone
Most performance microphones are directional.
The front is usually marked by:
- A logo
- A flat grille section
- A symbol or dot
Sound enters from the front—not the top, not the side, not the cable end.
Singing into the wrong side can reduce clarity by up to 70%
Correct Microphone Height
The microphone should align with:
- Your mouth, not your chin
- Not your nose
- Not angled sharply upward or downward
Ideal alignment:
- Capsule level with the lips
- A slight upward angle. But no more than 10–15°.
This preserves natural resonance and avoids nasal or dull tone.
Plosives, Breath and Control: Most Critical Element
The angle of the microphone relative to the mouth is critical for managing plosives (P, B, T etc sounds) and sibilance (S sounds). Plosive sounds (P, B, T) cause air blasts.
Solutions
- Use a pop filter for studio work
- Direct breath past the microphone, not into it
- Learn and practice the Singers Alphabet. It eliminates plosives. As simple as that.
Never sing directly through the microphone; sing across it
Handheld Microphone Technique
- Hold the body, not the grille
- Do not cover ventilation holes
- Keep grip relaxed—tight hands transfer tension to the voice
Your arm should move naturally with phrasing, not stiffly.
Room Awareness
The microphone hears the room.
- Avoid facing reflective surfaces
- Stand away from walls where possible
- Soft furnishings reduce harsh reflections
A great microphone cannot fix a hostile acoustic environment.
The Performer’s Mindset
The microphone is not an audience.
It is not a barrier.
It is a listener that never interrupts.
Do not ‘perform at’ the microphone.
Perform through it.
Using the correct technique, means that you do not worry about the performance. The result is mastery of the mic.
Daily Practice Exercise (5 Minutes)
First, carefully review each step below. Next, practise until you perfect your skills.
- Set your microphone at correct height
- Sing or speak one phrase at three distances:
- Close
- Medium
- Slightly far
- Listen back
- Note how movement, not force, controls sound
This builds instinct, not dependency.
Avoiding Common Pitfalls
Two common errors may ruin a potentially excellent performance:
- Covering the grille: Never cup your hand over the microphone grille, because this severely alters the polar pattern. Doing so creates a muffled, boxy sound and dramatically increases the risk of feedback.
- Pointing at speakers: Never point the microphone directly at a monitor speaker or the main house speakers. Doing this creates a feedback loop—the sound from the speaker is picked up by the microphone, amplified, and sent back to the speaker, resulting in the characteristic high-pitched screech.
Mastery of microphone technique provides the final polish for a confident performance. By understanding the principles of the equipment and applying controlled, deliberate positioning, you ensure that the audience hears only the best possible version of your voice. Consequently, free from distortion or unwanted noise.
Final Understanding
The microphone does not want more effort.
It wants clarity, consistency and respect for physics.
Once you master microphone technique, you remove the final barrier between your voice and the listener’s nervous system.
You perfect your technique. Your performance arrives intact.
Confidence While Singing
The Secret of Confidence: The Nature of True Confidence (Free Lesson)
Lesson Overview
There’s a misunderstanding that confidence is bravery, charisma, or fearlessness. In truth, confidence is none of these. Confidence is a state of internal alignment. When you understand this, confidence stops being mysterious and becomes trainable.

The VSL Harmonic Identity Technique teaches that once you know what you are doing, then confidence works with adrenaline.
The VSL Harmonic Identity Technique teaches that once you know what you are doing, then confidence works with adrenaline.
Confidence is not an innate trait. An acquired commodity. Or a permanent state of being.
You build it by learning how to master the mind, body and perception.
This principle underscores the reality that self-assurance is not a gift, but a discipline. Mastery is achieved not through passive waiting, but through active, deliberate practice.
We do not deny that some people are able to apply psychological and physical techniques. However, we teach you the proper skills to sustain performance at any level.
This lesson outlines the core components required to build, sustain and deploy unshakeable confidence in any performance environment.
The Foundation of Confidence: Preparation and Knowledge
Preparation is key. The most significant factor in mitigating performance anxiety is the absolute certainty that one has done the necessary work.
Comprehensive Preparation
Preparation must extend beyond mere competence. It requires internalising the material to the point where execution becomes automatic. Freeing the conscious mind to focus on expression and connection. This involves:
Practising the skill or material well past the point of simple proficiency. This creates a deep, resilient neural pathway that resists the disruptive effects of stress and adrenaline.
Rehearsing in conditions that simulate the actual performance environment, including lighting, acoustics and the presence of an audience. This reduces the element of the unknown, which is a primary trigger for anxiety.
Practising in various environments can help with distractions. Practising with noise in the background or facing different wall or rooms, is excellent for training the mind to cope with whatever is to come.
The Psychology of Performance: Directing Adrenaline
Performance anxiety is the body’s natural fight-or-flight response. Also commonly known as stage fright. The racing heart, shallow breath and heightened senses are all physiological preparations for a perceived threat. The secret to mastering confidence lies not in eliminating this response, but in re-framing and directing the resulting adrenaline.
Cognitive Re-framing
The physical sensations of fear and excitement are nearly identical. The difference lies in the cognitive label applied to them.
| Anxiety Label | Confidence Label | Effect on Performance |
| Fear (Threat) | Excitement (Challenge) | Leads to avoidance, tension and error-focus. |
| Nerves (Doubt) | Energy (Fuel) | Leads to engagement, fluidity and expression-focus. |
You are able to channel the adrenaline into enthusiasm and drive. By consciously labelling the physical arousal as performance energy rather than fear. Thus, enhancing focus and presence.
The biological signal, fear, protects energy and survival. Confidence collapses only when:
- You interpret fear as a warning of failure
- You attach fear to your identity
- You believe fear means “I am not ready”
In reality, fear simply means energy is mobilising.
Confident people feel fear. The difference is that they do not negotiate with it.
Practical Techniques for Mastery
Mastering confidence requires a toolkit of practical, deployable techniques. That can be used before and during a performance to manage your physical and mental state.
Physiological Regulation
The most immediate way to regain control is through the breath, which directly influences the nervous system.
Deep Diaphragmatic Breathing: Slow, deep breaths that engage the diaphragm signal safety to the brain, overriding the fight-or-flight response. This technique should be practised until it can be deployed instantly. The Breathing Techniques gives you a more in depth understanding of how to approach breathing.
Progressive Muscle Relaxation (PMR): Systematically tensing and releasing muscle groups helps to identify and eliminate physical tension that can constrict the voice or movement.
Mental Conditioning
- Long before the performance begins, confidence builds in the mind .
- Mentally rehearsing a successful performance, focusing on the sensory details—the feeling of control, the sound of the voice, the positive audience reaction. This creates a mental blueprint of success, making the actual event feel familiar and achievable.
- The fear of making a mistake is a primary confidence killer. Mastery involves shifting the focus from the impossible goal of perfection to the achievable goal of authentic expression. The audience values connection and emotion far more than flawless execution.
The Role of Routine and Imperfection
Confidence is a continuous process, not a final destination. Two final elements are crucial for long-term mastery.
The Pre-Performance Routine
A consistent routine acts as a psychological anchor, signalling to the mind and body that it is time to transition into performance mode. This routine should be a non-negotiable sequence of activities, such as vocal warm-ups, physical stretching and positive affirmations, culminating in the moment of stepping onto the stage.
Embracing Imperfection
The final secret of confidence is the acceptance of the inherent imperfection of live performance. Mistakes are inevitable. Recovering instantly defines the truly confident performer. Who can continue with poise. Allowing for a more relaxed, genuine, and ultimately, more confident performance. The pressure to be flawless lessens, when accepting that the audience is there to enjoy the overall experience. Not to scrutinise every detail,
Key Take Away
Confidence is not the absence of fear, but the mastery of action in its presence. By committing to comprehensive preparation, re-framing nervous energy and employing practical techniques, anyone can learn to master the secret of confidence.
Vocal Health & Care When Singing
Vocal Health & Care: Protecting Your Priceless Vessel
Your voice is not just a sound-making tool. Your Voice Is an Instrument, living and responsive. Made of muscle, cartilage, breath, resonance and finely tuned coordination. Just like a violin or piano, it requires correct handling, regular maintenance and respect. Vocal health is the foundation of all singing and speaking. Without it, technique collapses, confidence fades and long-term damage can occur.
This lesson will teach you our Harmonic Identity ethos on how the voice works, what harms it and how to protect and strengthen it for a lifetime of reliable use. Let us teach you How to Protect Your Priceless Vessel.
What is Voice/Phonation
Voice, or the other way to say it, Phonation, can be described as the sound produced by the vibration of the vocal cords.
Imagine a cello. The strings twang when manipulated. A soft touch, gives a softer sound and a harsher twang, gives a louder sound. Now imagine that the twang is a vibration. Caused by the air on your vocal cords and the more air, then the more sound. How that all ends up sounding, depends on how you, the owner of that vocal instrument, manipulates it. How you use your vocal cords.
The vocal cords are two bands of smooth muscle tissue that are positioned opposite each other in the larynx.
The larynx is located between the base of the tongue and the top of the trachea, which is the passageway to the lungs.
The vocal cords are able to open and close. They stay open so that you can breathe. That however, all changes when you sing.
Vocal Cords Explained
Here is how The National Institute on Deafness and Other Communication Disorders (NIDCD) explains the vocal cords and how they help you achieve sound:
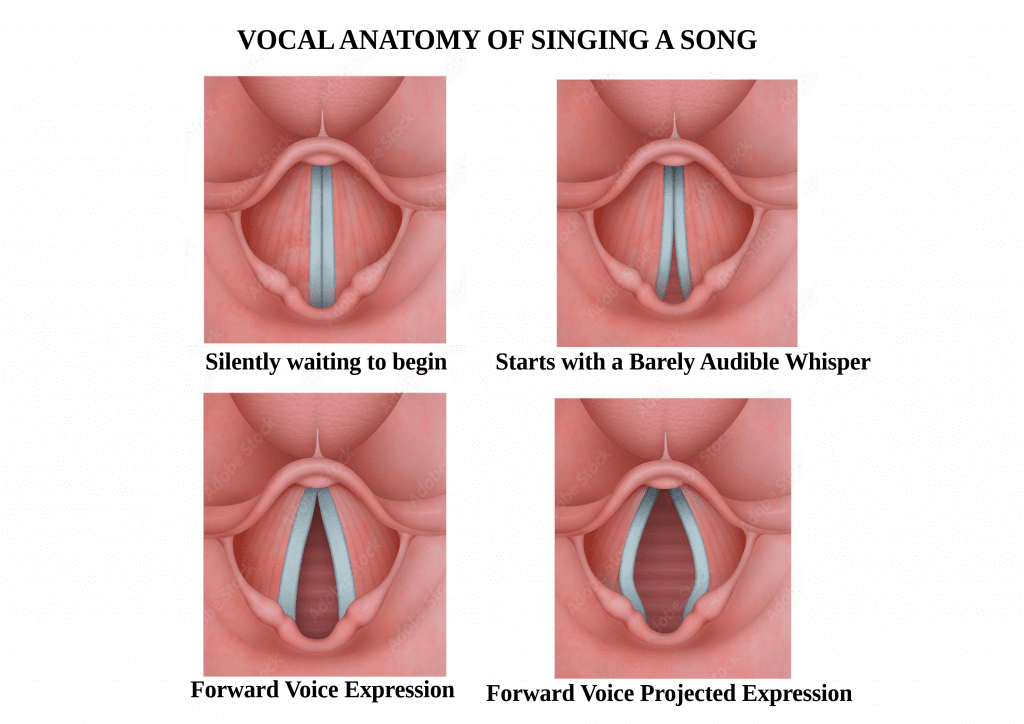
When it’s time to speak, the brain orchestrates a series of events. The vocal folds snap together while air from the lungs blows past, making them vibrate. The vibrations produce sound waves that travel through the throat, nose, and mouth, which act as resonating cavities to modulate the sound.
The quality of your voice, its pitch, volume and tone, is determined by the size and shape of the vocal folds and the resonating cavities. This is why our voices sound so different.
That’s amazing isn’t it. Now you know why some people naturally sound great and need little vocal assistance, while others feel that they need more help. It’s all determined by your vocal cords. We will explore how health affects your phonation a bit later.
Harmonic Identity Technique
VSL uses our Harmonic Identity Technique to show you how to manipulate your vocal cords to achieve the sound that you want, by acknowledging that phonation works as a system and does not stand alone.
Not everyone sings for a living, thus, a singer may speak at work, making great demands on their voice. So, the more that you have to speak, means the more that you are at risk for a voice problem emerging. The ‘music to your ears’ is that, by looking after your voice, some voice problems can be prevented or eliminated.
How can you be aware of an unhealthy voice?
Many vocal problems come not from singing itself, but from daily habits. You may have a voice problem if:
- Your voice become hoarse or raspy.
- You lost your ability to hit some high notes when singing.
- Your voice suddenly sound deeper.
- Your throat often feel raw, achy, or strained.
- It become an effort to talk.
- You find yourself repeatedly clearing your throat.
- Speaking or singing too loudly or forcefully Caused by:
- Shouting or calling across distances
- Chronic throat clearing or coughing
- Poor posture and shallow breathing
- Singing outside your comfortable range
- Lack of rest and recovery
- Dehydration
- Smoking or exposure to dry, polluted air Even emotional tension and stress can tighten the throat and jaw, directly affecting vocal freedom.
Key point: The vocal folds are delicate. They are not designed for force, shouting, or constant strain. Healthy vocal production relies on efficient airflow, relaxed muscles and balanced coordination, not power or pressure.
When the voice is misused, the folds can become inflamed, swollen, or injured, leading to hoarseness, loss of range, fatigue, or even permanent damage.
That said, It is comforting to note, that the problems that we have mentioned, such as having a cold, stress, eating dairy or other temporary conditions, can be just that, temporary problems.
Harmonic Identity voice care advice:
Stay hydrated:
- Drink plenty of water, especially when exercising. Not fridge cold. It’s kinder to your voice.
- If you drink beverages that contain sugar or alcohol, balance your intake with plenty of water, or even lemon in water is better.
- Rest your voice throughout the day. Take vocal naps.
- Humidify your home. This is especially important in winter or in dry climates.
- Try to use natural over the counter medications. If you have a more serious problem, your Doctor is the best person to advise of the best and safest product for you.
Maintain a singers healthy lifestyle and diet:
- Avoid first and second-hand smoke. Smoke irritates the vocal folds causing vocal damage.
- Dairy before singing is not advised. It causes excess phlegm production and coats the vocal cords, hence the need to keep clearing the throat. Sugar may do the same.
- Fruits and vegetables, as well as whole grains, will enhance your diet. These foods contain vitamins A, E, and C. They also help keep the mucus membranes that line the throat healthy.
- At the Advanced Level of learning, our students are able to sing past a cold or flu. But, that said, who want to feel ill? Protect your instrument and stay away from germs on your hands etc.
Rest and Vocal Boundaries
Silence is not weakness, it is recovery. If your voice feels tired, hoarse, or strained, stop. Pushing through pain or discomfort, is one of the fastest routes to injury.
Learn to:
- Respect vocal fatigue
- Take vocal rest when needed
- Avoid whispering (it strains the folds more than gentle speech)
- Physical fatigue has a negative effect on voice.
- Exercise regularly. Exercise increases stamina and muscle tone. This helps provide good posture and breathing. A toned abdominal area, lifts the voice. Try it.
- Try not to overuse your voice. Avoid speaking or singing when your voice is hoarse or tired. Remember, vocal naps.
- Rest your voice when you are unwell. Avoid the extra stress on your voice.
- Stay within your vocal range. Seems obvious, but shouting, or whispering may stress your voice. Our Lessons help with this, until you are able to use Harmonic Identity Techniques to overcome these obstacles.
- Practice good breathing techniques. Our Breathing Techniques Lesson is perfect to start you on the path to better vocals, air flow and even digestion. We teach you how to sing and even speak past your throat. Our Harmonic Identity Technique, shows you how to use breath first, to support your phonation.
- It may seem an overkill to mention, but avoid cradling the phone when talking. Cradling the phone between the head and shoulder for extended periods of time can cause muscle tension in the neck.
- Practice your songs with a microphone. Don’t be afraid of using a microphone whenever you speak in a crowd. Our Microphone Techniques Lesson will show you how it’s done properly.
Sleep, general health and emotional wellbeing all directly affect vocal reliability. Use your voice wisely
Warming Up and Cooling Down
Never treat your voice like a machine that can instantly switch on at full power. Warm-ups prepare the muscles and coordination needed for healthy sound.
Effective warm-ups include:
- Gentle ‘hum-ming-ahh’s’
- Diction via Singer’s Alphabet
- Arpeggios through a comfortable range
You see, cooling down after heavy voice use helps release tension and restore balance, just like stretching after exercise. Note that the same exercises are used to do both warm-ups and cool-downs. The ultimate, however, will always be rest and hydration.
So, if you haven’t already done so, purchase the Singer’s Alphabet, Arpeggios and Warm Ups Lessons. They are unique to VSL and will be part of your secret weapons that set you apart, quickly.
Long-Term Vocal Care Mindset
Think of your voice as a lifelong companion. With correct care, it can remain strong, flexible and expressive well into later life.
Healthy vocal technique does not fight the body, it works with it. The goal is ease, clarity and freedom, not effort or force.
By caring for your voice daily, you protect not only your sound, but your confidence, identity and creative freedom. Practice Makes Perfect.
Key Takeaway
Your voice is irreplaceable. Treat it with intelligence, patience and respect and it will serve you faithfully.
- Diction For Singing & Speaking
- How to Control Vibrato In Singing
- How To Sing Head Notes
- Learning Microphone Techniques
- Confidence While Singing
- Vocal Health & Care When Singing